

This post was originally published on this site.
Version 1.7.0 of WordPress Studio is a major upgrade for anyone building WordPress sites locally, especially developers and power users who like to automate tasks and work from the terminal.
In earlier releases, the Studio CLI focused mainly on creating and managing preview sites.
With version two, it becomes a full-featured command-line companion for much of your Studio workflow, including creating and managing local sites, running WP-CLI in the right context, connecting to WordPress.com, and more.
In this post, we’ll review what’s new and share practical ways to incorporate the Studio CLI into AI-assisted workflows.
For the full command reference and advanced options, see the updated Studio CLI documentation included with this release.
What is a CLI?
A CLI (command-line interface) lets you control tools and applications by typing commands into a terminal, instead of clicking through menus. Developers tend to like CLIs because they’re:
- Fast: Spin up, change, or remove environments with a single command
- Repeatable: Run the same commands on any machine, or bake them into scripts
- Automatable: Let build systems and AI agents run commands for you
Even if you don’t typically work in the terminal, the Studio CLI is still worth paying attention to.
It’s the common “language” automation tools can use to interact with Studio. Once it’s enabled, your editor, scripts, or AI coding assistants can do things like create a new site, run database upgrades, or publish a preview without you having to navigate through multiple screens in the Studio application.
Getting started with the Studio CLI
To begin using the Studio CLI, complete the following steps:
- Open the WordPress Studio application on your machine.
- From the main menu, open the Settings modal. You can also click the gear icon in the top-right corner of the app.
- Enable the Studio CLI option and click Save.
- On macOS, you’ll be prompted for your computer password to allow installation.
Once the Studio CLI is enabled, you will have access to a global studio command from your preferred terminal application:
In Studio 1.7.0, the CLI now covers four main areas:
- Authentication: Manage your WordPress.com account for features that require it
- Preview sites: Create and update WordPress.com hosted preview sites
- Local site management: Create, start, stop, configure, and delete Studio-managed local sites
- WP-CLI integration: Run WP-CLI commands inside correctly configured Studio environments, without installing WP-CLI yourself
You can see an overview at any time by running studio --help:
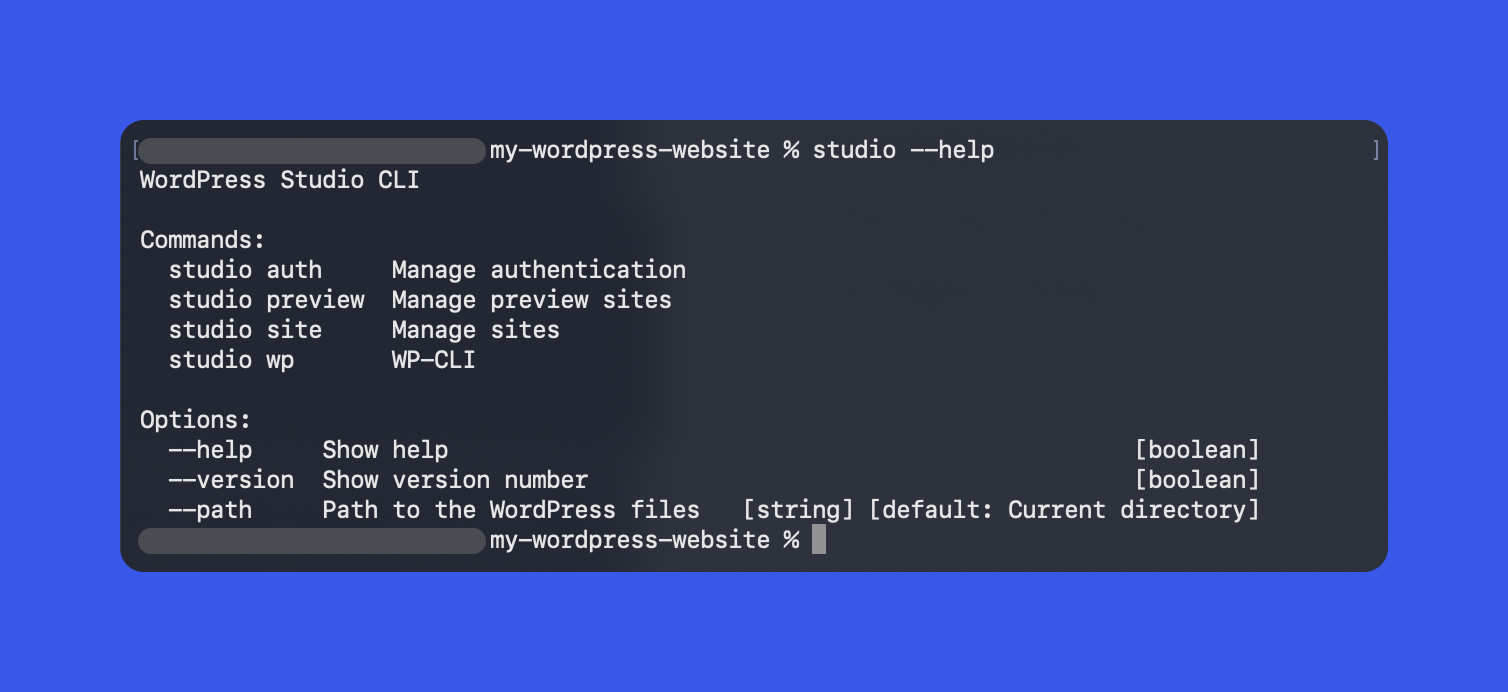
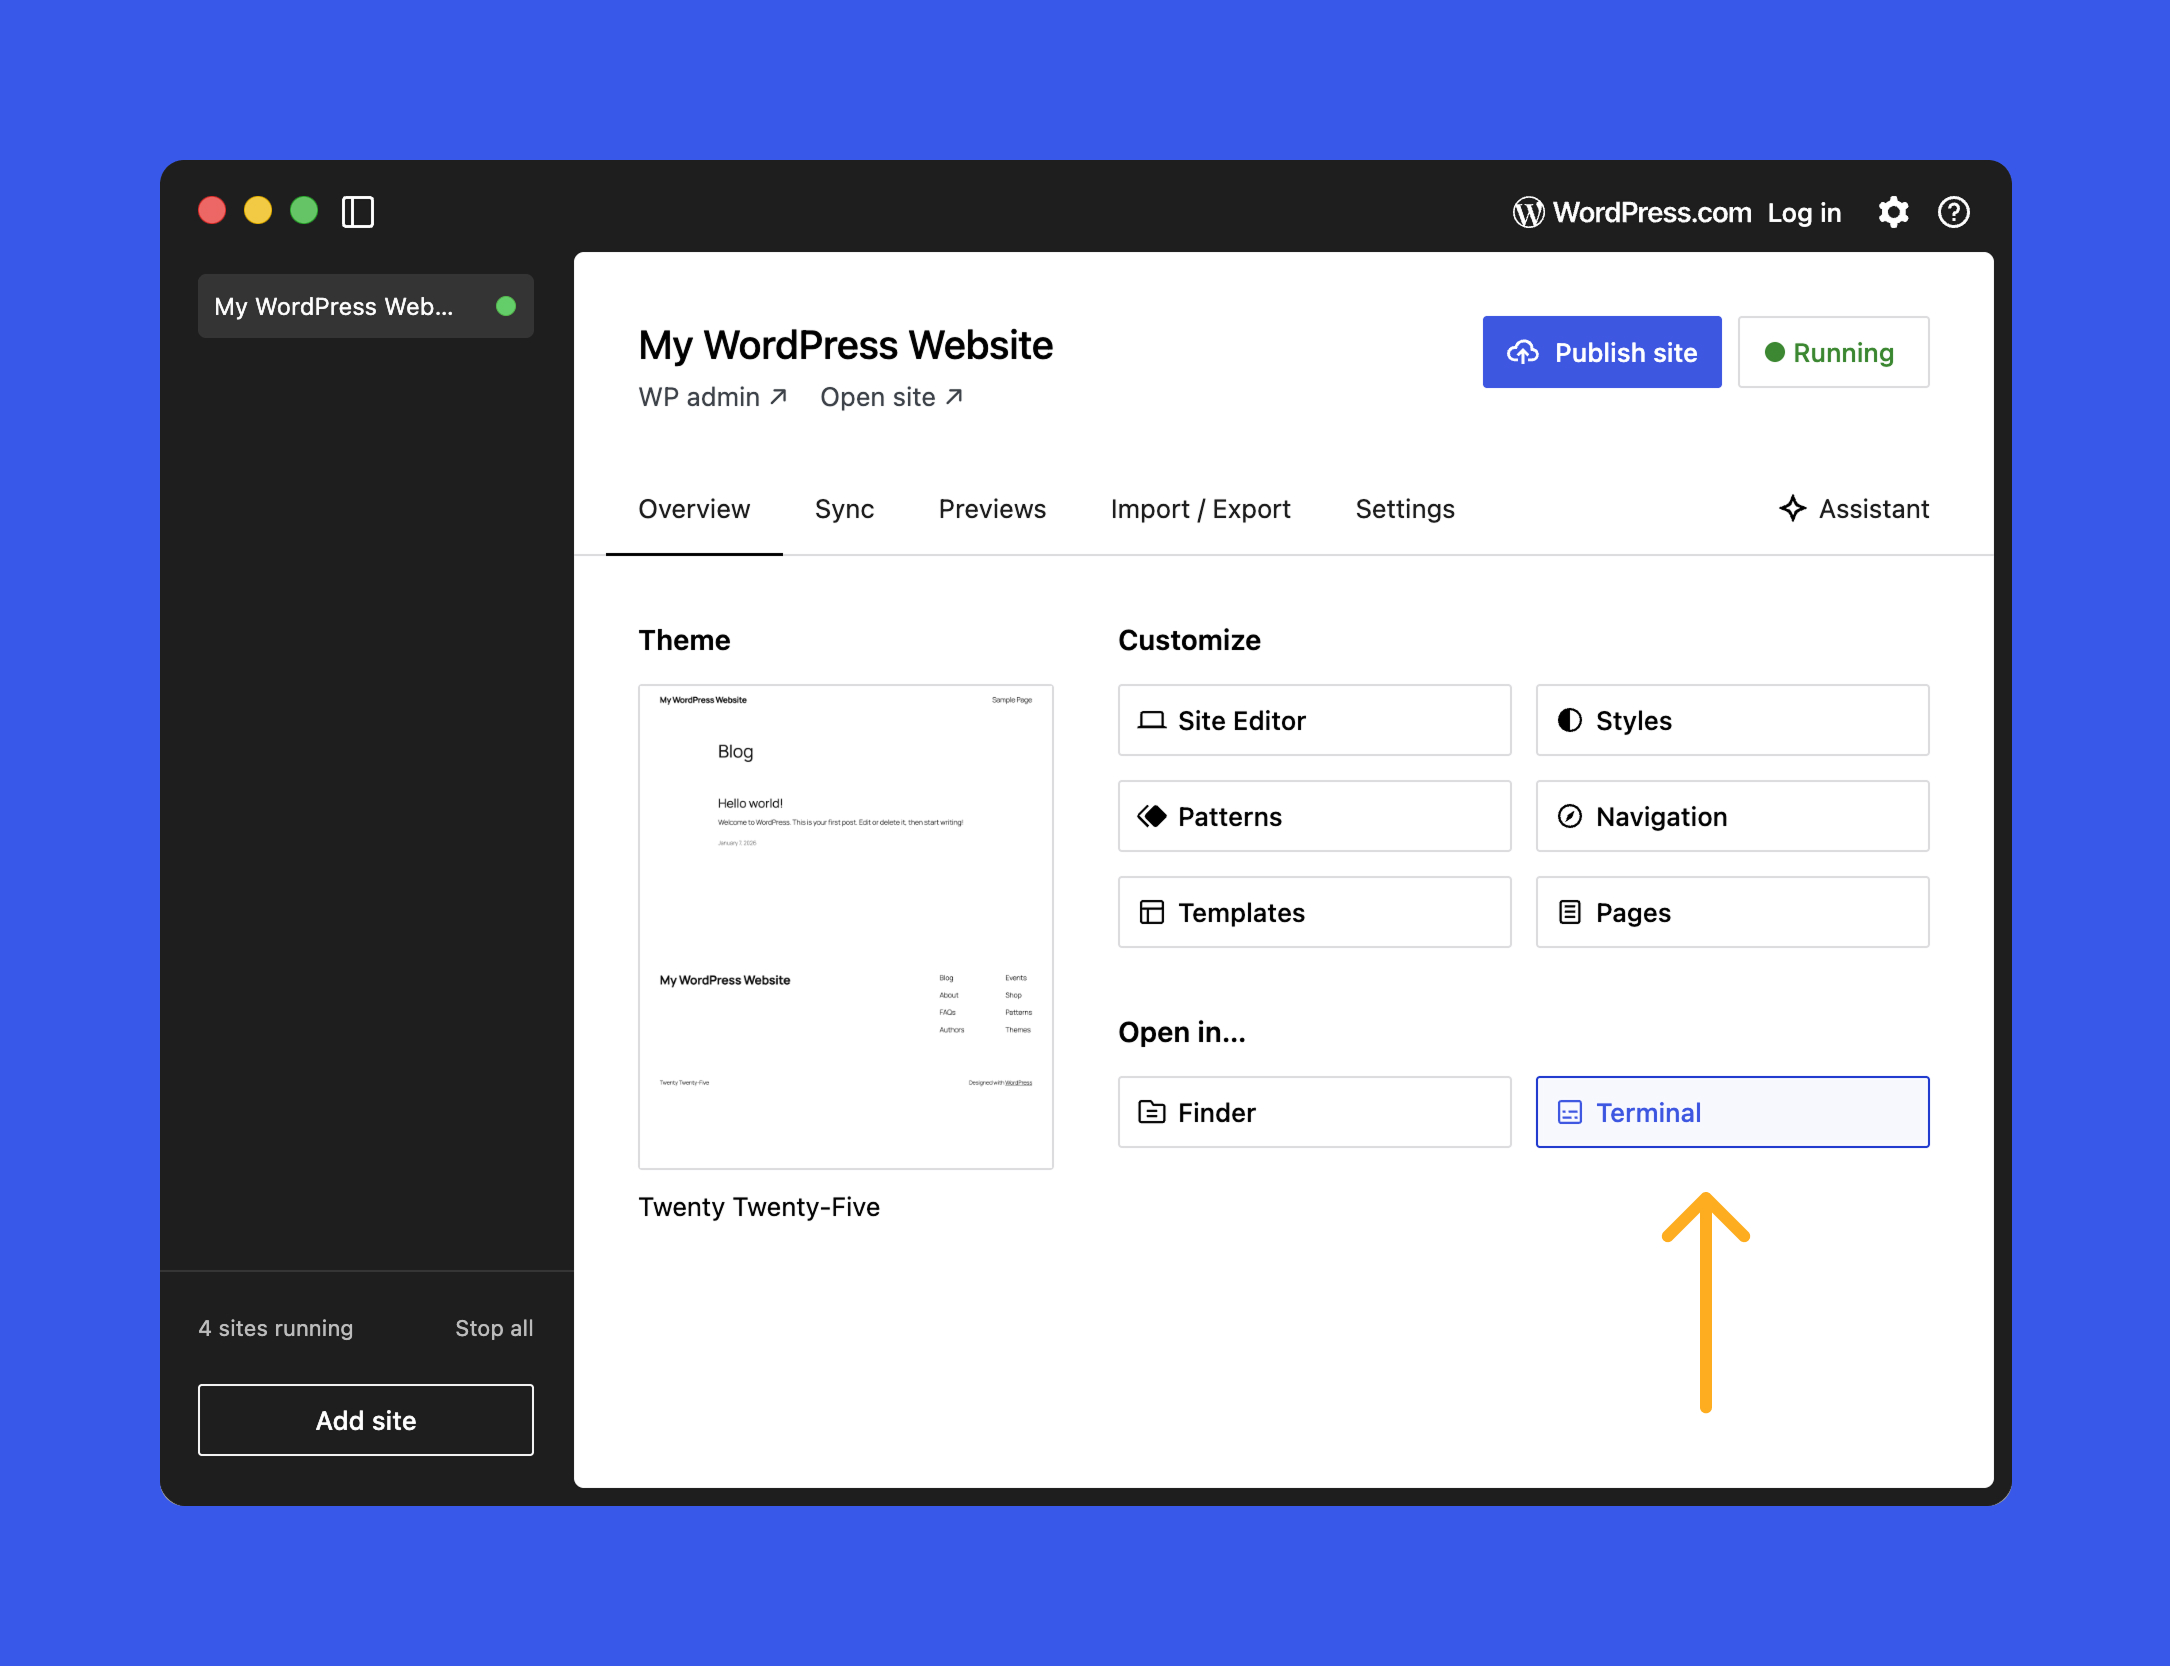
Most commands are designed to be run from the root folder of a Studio-managed site.
For quick access, you can open that folder directly in your terminal by clicking the Terminal button on the site’s Overview tab.
Managing local Studio sites
One of the biggest upgrades in Studio CLI v2 is end-to-end local site management from the terminal.
Rather than switching back to the Studio user interface for routine tasks, you can create a site, check its status, start or stop it, and clean it up when you’re finished.
It’s a faster day-to-day workflow, and it also makes automation much easier, whether you’re writing scripts yourself or using an AI agent to do it for you.
At the center of it all is the studio site command. The available options include:
Create local sites with a single command
Use studio site create to spin up a new site in your current directory or at a specific path. Here are a few examples of what you can do:
The CLI will:
- Set up a local WordPress environment.
- Start the WordPress server.
- Open WP Admin in your browser when it is ready.
You can run this from an empty folder, or from a directory that already contains a WordPress site that is not yet registered within the Studio app.
List, inspect, start, and stop local sites
When you are working with multiple local sites, the `list` and `status` commands make management much easier:
Status output includes:
- Whether the site is running
- The local URL, for example
http://localhost:PORT - Key configuration details such as PHP version and login information
Starting and stopping sites is also straightforward:
This works well in scripts that need to start a site, run tests or content operations, and then stop it again.
Delete and configure sites safely
When you are finished with a project, you can remove it from Studio and, if needed, delete all the associated files from your machine with the following commands:
For configuration changes, studio site set lets you adjust settings for a specific local site:
You can, for example:
- Change the PHP or WordPress version.
- Update the local domain or port.
- Toggle features that affect how the local environment runs.
Tip: Run studio site set --help for the full list of available options.
Authentication from the terminal
Some Studio features, such as creating or updating preview sites, require a logged-in WordPress.com account.
Studio CLI v2 gives you dedicated studio auth commands so you can manage this from the terminal:
studio auth loginlaunches a browser flow and gives you a token to paste back into your terminal to complete the login.studio auth statustells you whether you are authenticated and which account is active.studio auth logoutdisconnects the CLI from your WordPress.com account and clears stored credentials.
If you run a command that needs authentication while logged out, such as studio preview create that we will review next, the CLI will guide you to log in.
Preview sites from the CLI
Preview sites are temporary, shareable environments hosted on WordPress.com that mirror your local Studio site. They are ideal for sharing work with others who do not have a local environment.
The CLI provides a complete set of commands:
Tip: Run studio preview list to see all previews associated with your WordPress.com account, then use the host value from that output with studio preview update or studio preview delete.
Built-in WP-CLI, configured for you
WP-CLI is the official command-line interface for WordPress itself. Studio CLI v2 integrates it directly through a dedicated studio wp command, so you do not need to install or configure WP-CLI on your own:
From your site’s root directory, you can run common WP-CLI tasks like:
studio wp core versionshows the WordPress version for the current site.studio wp plugin listlists installed plugins (and their status).studio wp core update-dbruns any required database updates after a WordPress update.
Studio sets the environment variables, paths, and credentials for you, so these commands run against the correct database and files with no extra setup.
Using Studio CLI with AI coding tools
One of the biggest advantages of Studio CLI v2 is how naturally it fits into AI-assisted development workflows, especially with tools like Claude Code and Cursor.
These agents read the code in your local project (including themes and plugins) and run commands in your environment, which makes it possible to offload much of the repetitive work. For example, they can:
- Use
studio sitecommands to create, start, stop, and manage local environments. - Run
studio wpfor diagnostics, database tasks, and content management. - Create and update WordPress.com preview sites for review without leaving your editor.
Provide context
The AI tool you’re using may not automatically understand WordPress Studio or the Studio CLI. To get useful results, start by giving the AI agent a bit of context about what it’s looking at and what tools it can use.
For example, imagine you’ve opened a local Studio site folder in your terminal.
Begin by telling the AI agent what this directory is, and that it can run the Studio CLI.
In this example, we’ll use Claude Code and explicitly note that it can invoke the CLI via studio.
“This is the folder for a WordPress Studio site. You have access to the Studio CLI, which can be invoked by running studio. Start by exploring the available options.”
From there, you should get a response that looks like this:
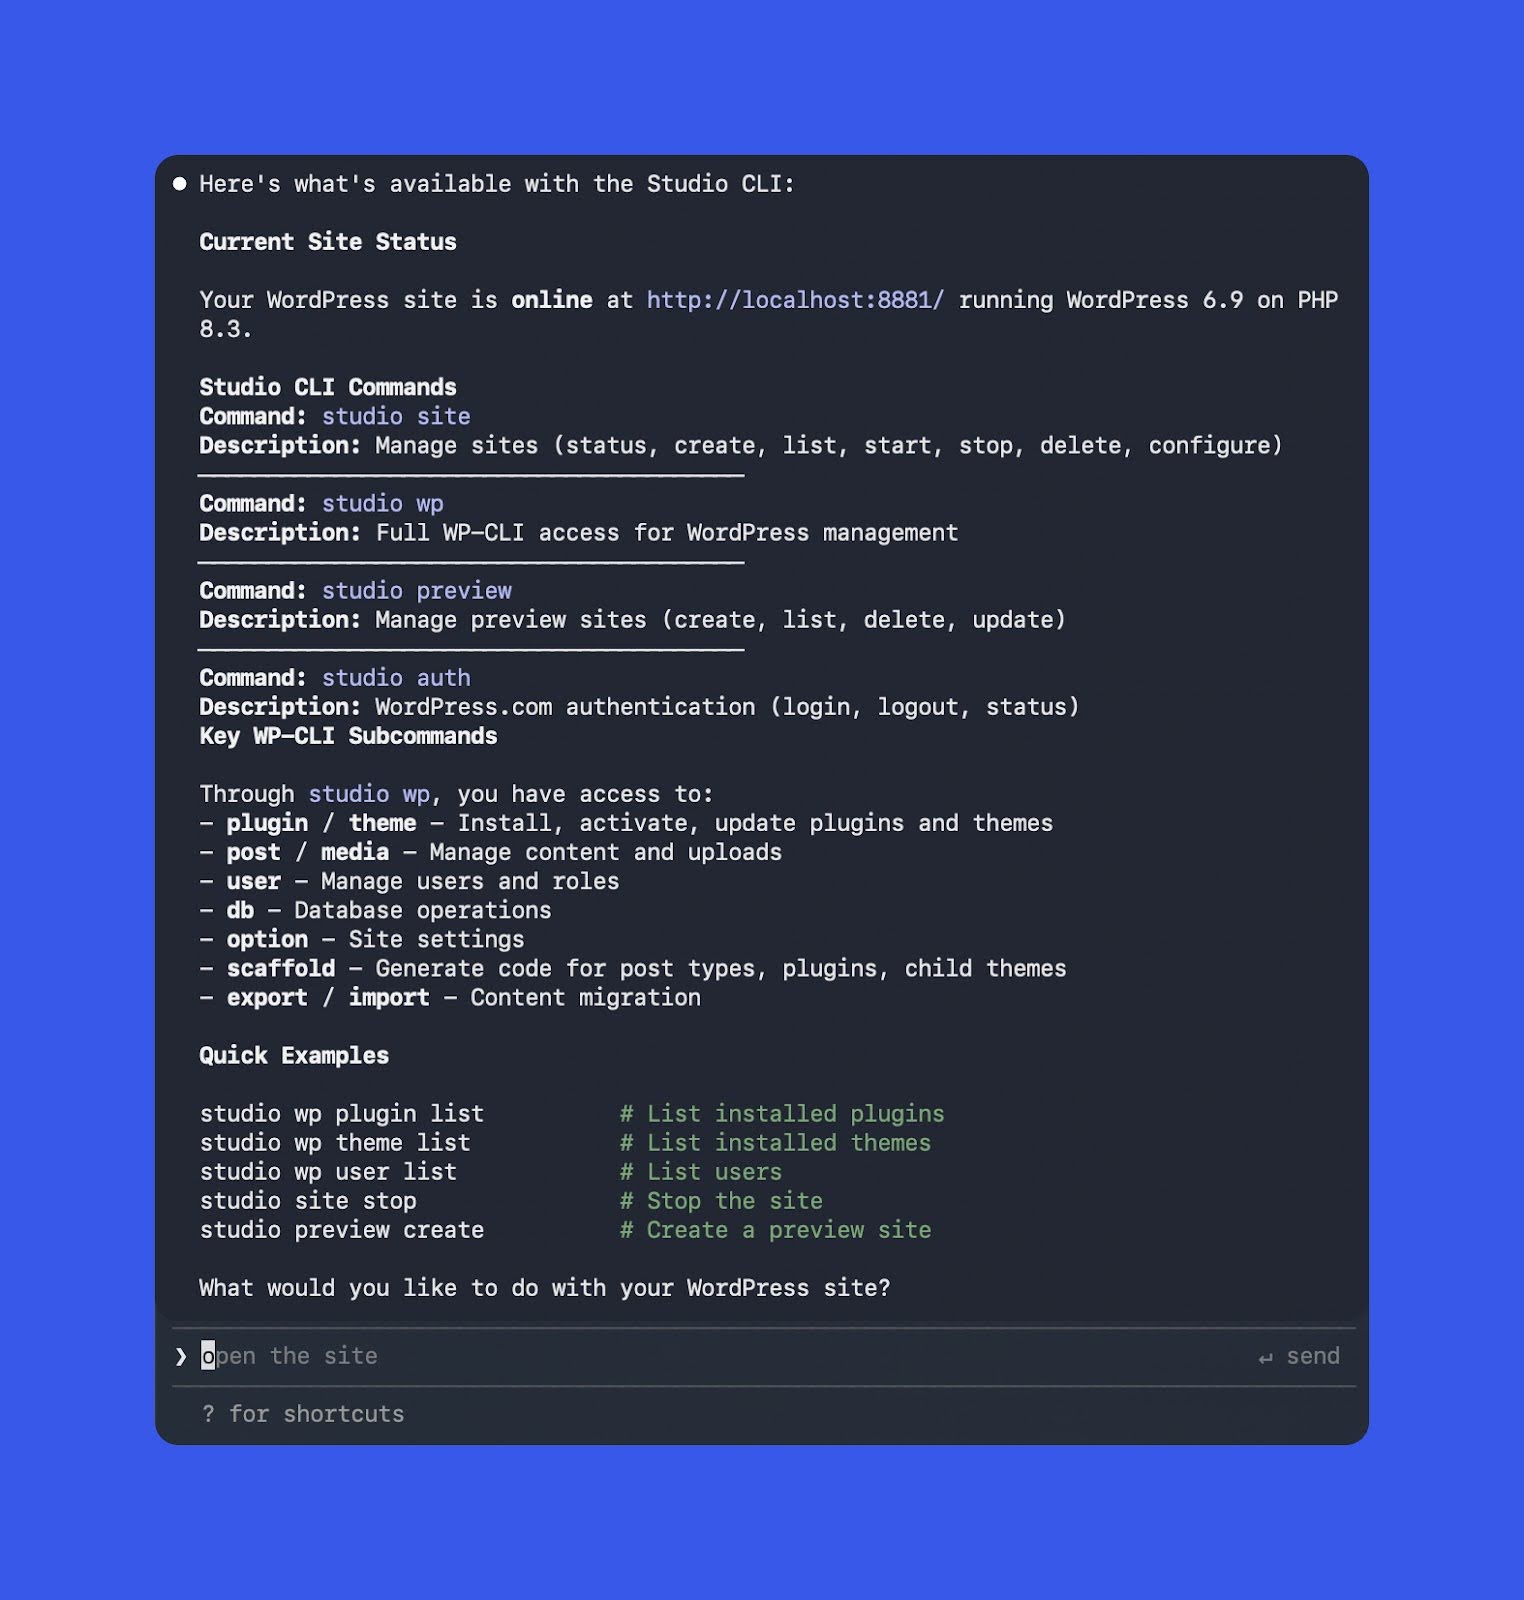
With a simple prompt, the AI now has a solid understanding of the Studio CLI. This example was generated using Opus 4.5.
Automate environment setup
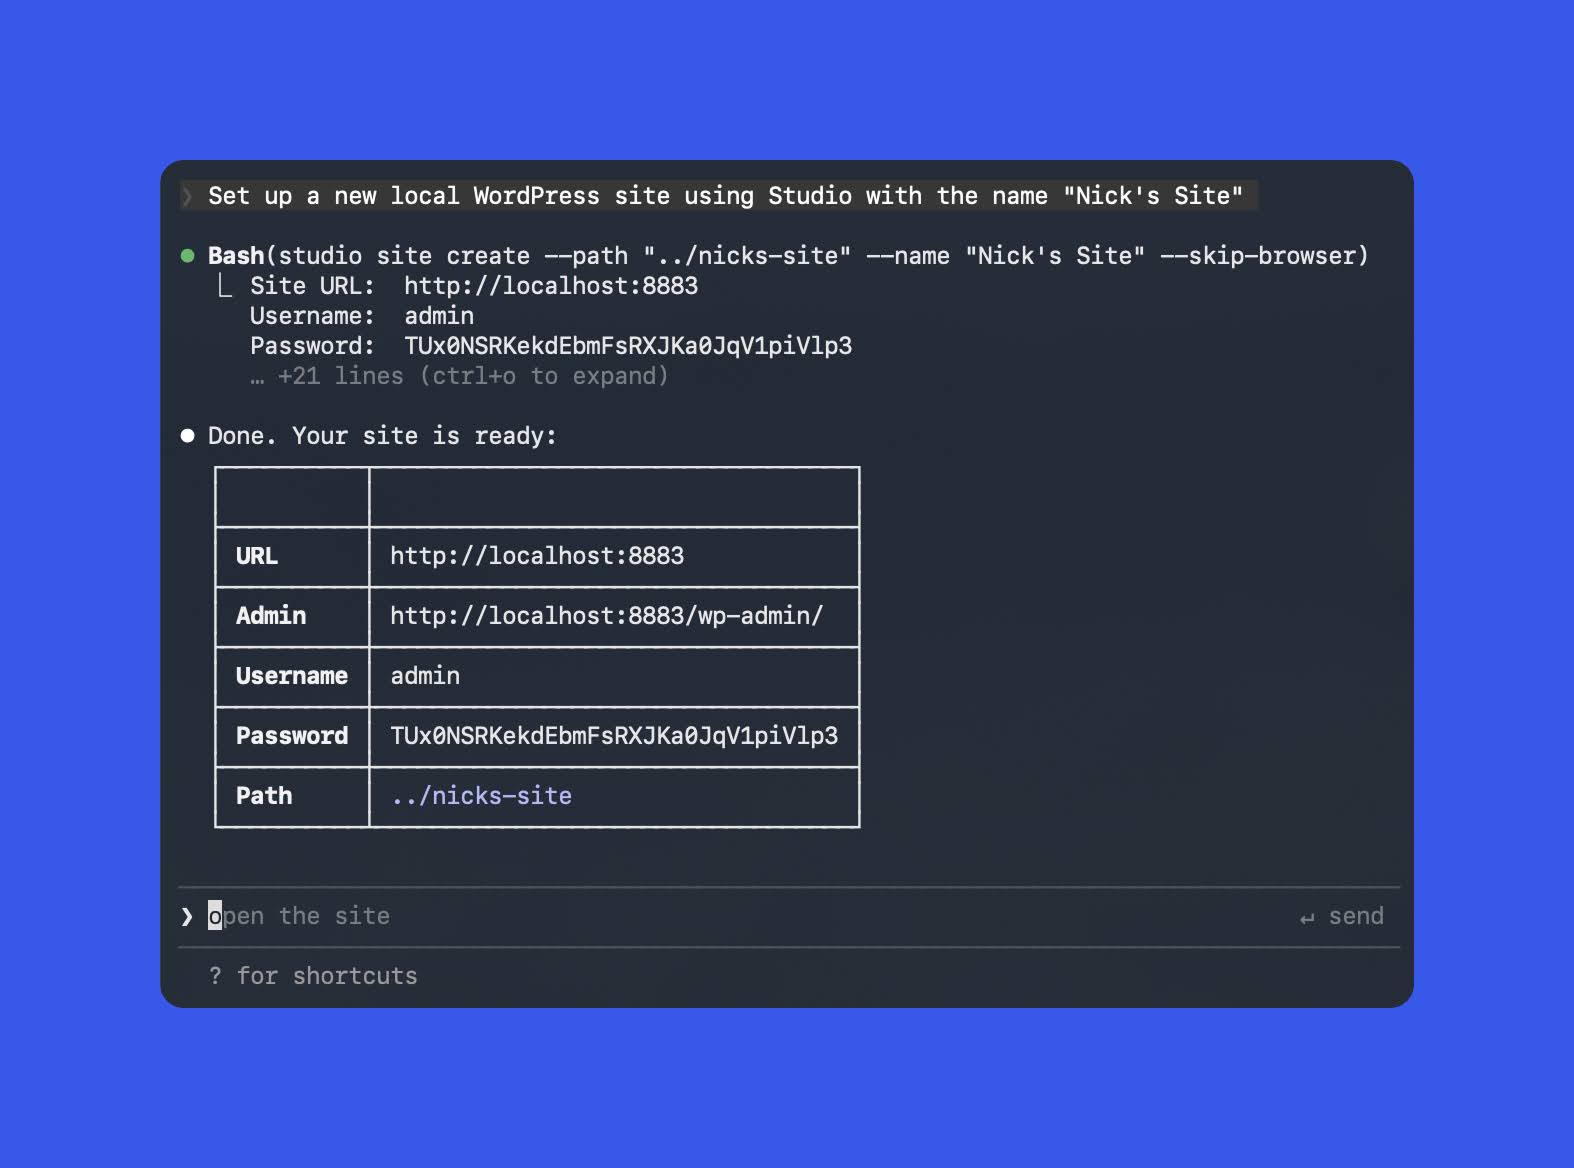
Once the AI understands what Studio can do, you can start handing off routine setup tasks. For instance, you might tell your agent:
“Set up a new local WordPress site using Studio with the name “Nick’s Site””
Behind the scenes, it may run something like:
Here’s an example of the output from Claude Code, again using Opus 4.5.
Debugging and verification with WP-CLI
Studio also makes it easy to troubleshoot issues using WP-CLI — especially when you’re staring at an error and don’t want to manually hunt down the cause.
You might say:
“Use the Studio CLI to run WP-CLI checks and figure out why this site is failing, then propose fixes.”
From there, the agent can:
- Run
studio wpcommands (for example,plugin list,theme list, orcore update-db) to collect diagnostics. - Suggest (or apply) code and configuration changes based on what it finds.
- Re-run the same WP-CLI checks to confirm the issue is resolved.
If you haven’t already, check out this great overview of WP-CLI to get a sense of what it can do.
Creating preview sites
Preview sites are one of the most popular features in WordPress Studio, but creating them and keeping them updated can feel a bit tedious if you’re doing it through the Studio user interface.
The CLI streamlines the workflow, and it becomes even easier when you pair it with an AI agent.
When you’re ready to share your work with a client or teammate, you can simply ask your AI to create a preview site:
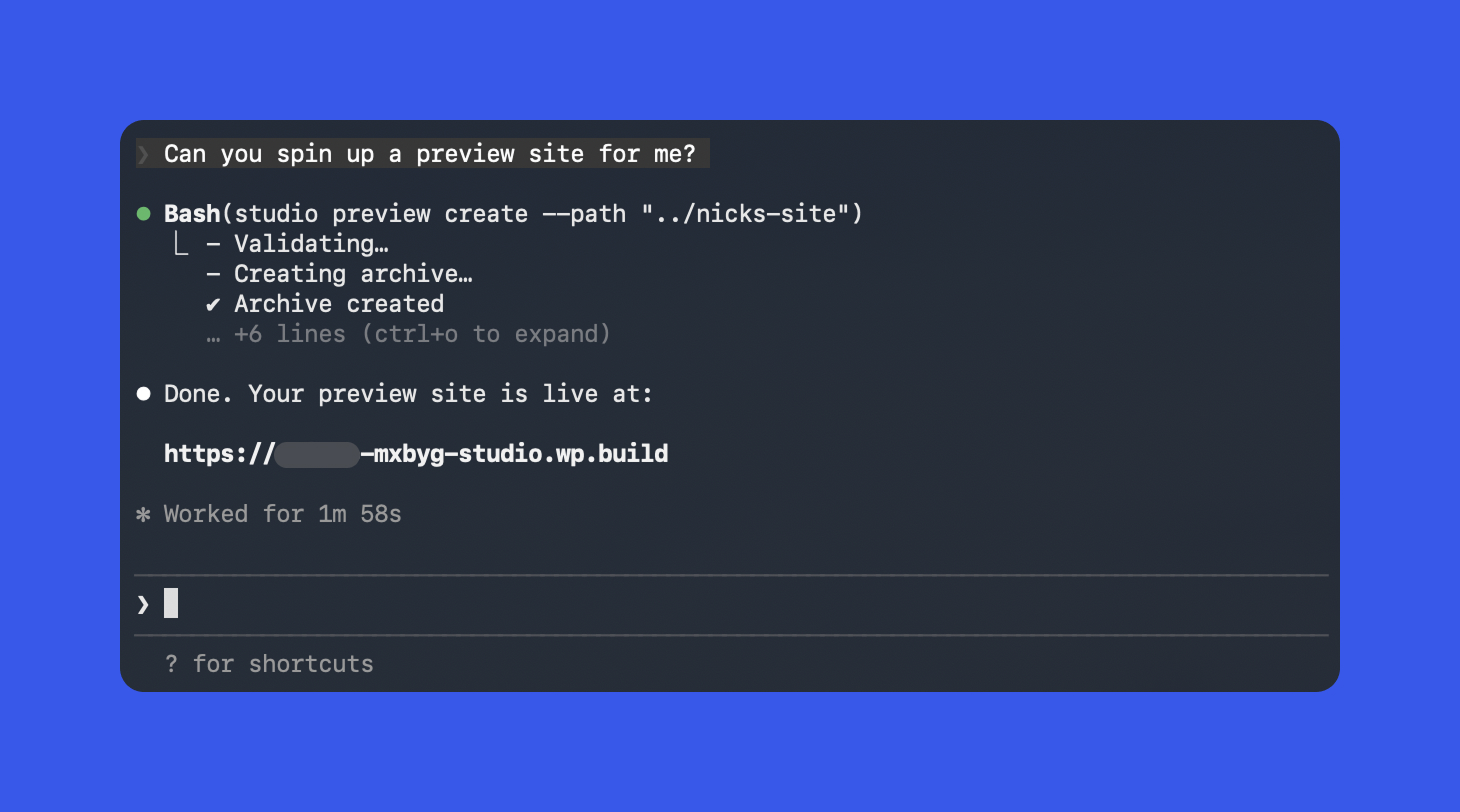
“Can you spin up a preview site for me?”
If you’re not already authenticated, the agent will prompt you to log in, then it will create the preview and return the URL. The output should look something like this:
As you continue working locally, you can periodically ask the agent to update the preview site.
If you’re also using the AI to help build the site, theme, or plugin, you can even add a rule like: after any major change, update the preview site automatically so your shared link stays current.
Best practices when using AI with Studio CLI
AI agents can be incredibly effective copilots when you pair them with the Studio CLI. They can speed up setup, troubleshooting, preview deployments, and run real commands against your environment.
That said, a little structure up front helps you get the benefits while avoiding unpleasant surprises.
- Work from the Studio site root (or use `–path`). This ensures commands run against the project you actually intend, especially if you have multiple sites on your machine.
- Set clear boundaries in your prompts. For example: “Do not delete sites,” “Only run read-only studio wp commands,” or “Ask before running database migrations.”
- Double-check destructive operations. For commands like
studio site deleteandstudio preview delete, have the agent show you the exact commands it plans to run before it executes anything.
Used thoughtfully, AI plus Studio CLI can remove much of the repetitive setup, testing, and deployment friction, so you can focus more on designing and building great WordPress experiences.
Start building with Studio CLI
Studio CLI v2 makes WordPress Studio more scriptable and automation-friendly for everyday development, whether you’re running commands yourself or working with an AI agent.
If you want to go further, the Studio CLI documentation walks through everything you can do and how to fit it into your workflow.
If you haven’t tried WordPress Studio yet, or it’s been a while, this is a great time to jump in. Download Studio, spin up a site, and take the updated CLI for a quick test drive.


