Crimson Desert’s Iliya Island is one of the earliest islands you’ll visit in its Charting the Unknown DLC. The island is absolutely massive in size, and incredibly vertical, too, ensuring that secrets are hard to find.
If you’re just jumping into this island, we’ve compiled this Iliya Island exploration guide for you. In this guide, we’ll go over all the puzzles you can find, treasure chests you can loot, and will walk you to its lone Mural.
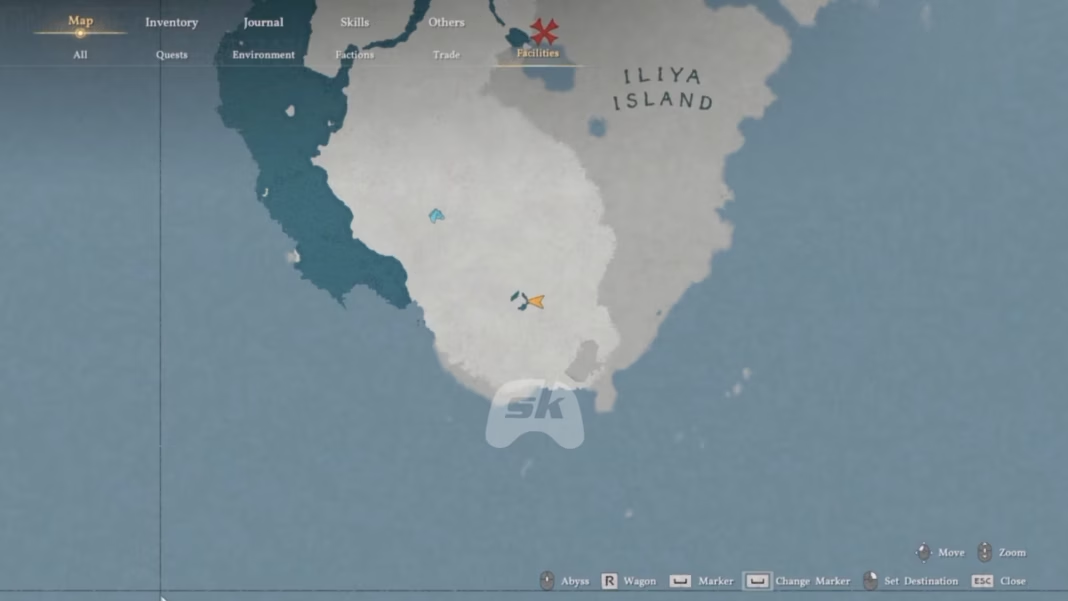
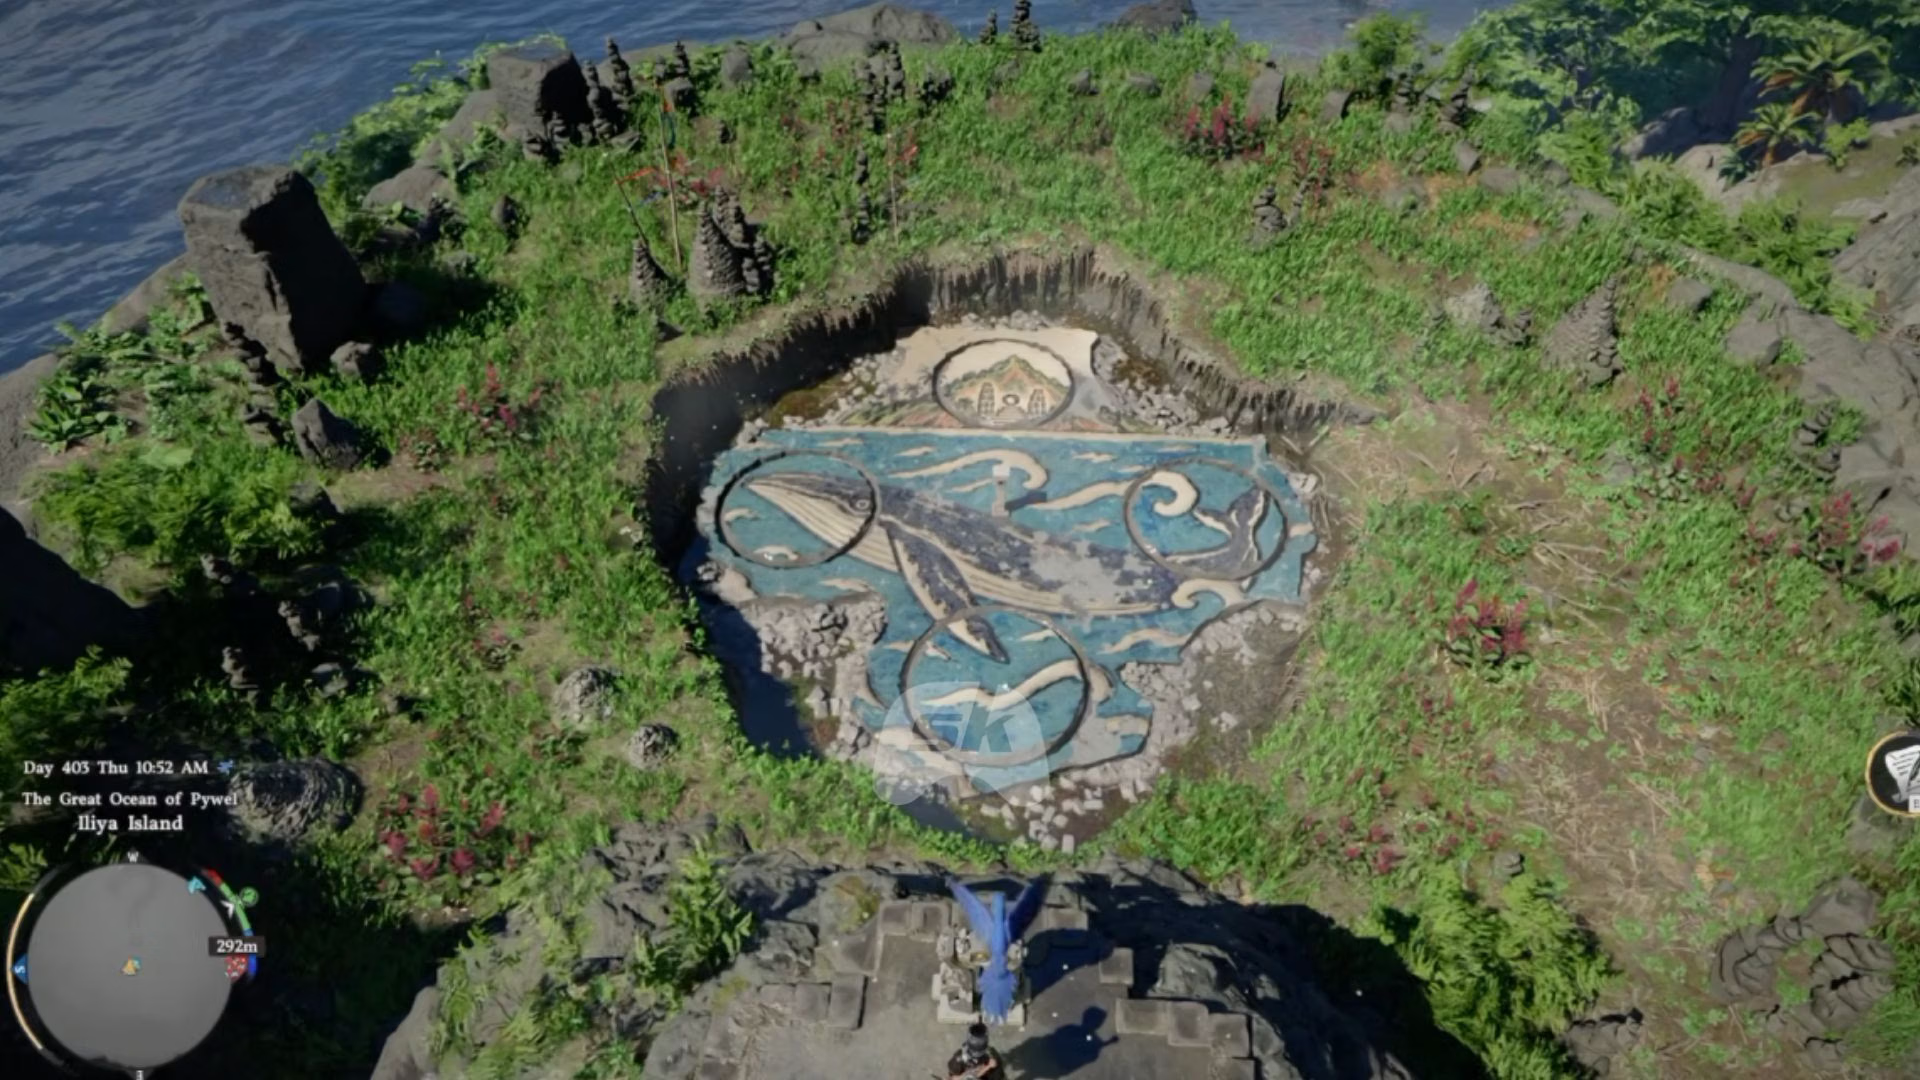
Once you’re on Iliya Island, head to the southern tip of the island to reach the Ocean Ruins. The image above marks the location you need to go to. Once you arrive here, you’ll find a giant altar overlooking an illustration on the ground.
Stand at the altar, and you’ll notice that the illustration is incoherent. You need to rotate the movable parts of this illustration to form a coherent image. The image you’re going for is that of a whale with a house on the horizon.
” srcset=”https://www.sme-insights.co.uk/wp-content/uploads/2026/11/e6b3d-17936551463854-1920.avif?w=190 190w, https://www.sme-insights.co.uk/wp-content/uploads/2026/11/e6b3d-17936551463854-1920.avif?w=720 720w, https://www.sme-insights.co.uk/wp-content/uploads/2026/11/e6b3d-17936551463854-1920.avif?w=640 640w, https://www.sme-insights.co.uk/wp-content/uploads/2026/11/e6b3d-17936551463854-1920.avif?w=1045 1045w, https://www.sme-insights.co.uk/wp-content/uploads/2026/11/e6b3d-17936551463854-1920.avif?w=1200 1200w, https://www.sme-insights.co.uk/wp-content/uploads/2026/11/e6b3d-17936551463854-1920.avif?w=1460 1460w, https://www.sme-insights.co.uk/wp-content/uploads/2026/11/e6b3d-17936551463854-1920.avif?w=1600 1600w, https://www.sme-insights.co.uk/wp-content/uploads/2026/11/e6b3d-17936551463854-1920.avif 1920w”>This is the image we’re going for (Image via Pearl Abyss)
Interact with the dial at the altar to begin the puzzle. Carefully follow the steps to solve the puzzle:
Now, select the bottom and right circles. The selected circles will move together, but don’t worry about that. Focus only on the bottom circle till it aligns with the whale’s fin.
Next, select the left, top, and right circles. Focus only on the right circle and turn it till the tail lines up with the whale’s body.
Now, select all four circles, and focus only on the left circle. Turn it around till the whale’s head lines up with its body.
After that’s done, select the bottom and right circle once again. Focus on either of the two circles, and turn it till it lines up with the whale’s body. You’ll notice that this time, the other circle has lined up with the whale’s body as well.
Finally, select the top circle, and align the house till it lines up perfectly on the horizon. You want its pointy tip facing upwards.
Solving the puzzle will unlock the Abyss Cresset above the illustration.
Crimson Desert Iliya Island Bonus hidden Cresset (bell puzzle)
” srcset=”https://www.sme-insights.co.uk/wp-content/uploads/2026/11/64a8e-17936554951343-1920.avif?w=190 190w, https://www.sme-insights.co.uk/wp-content/uploads/2026/11/64a8e-17936554951343-1920.avif?w=720 720w, https://www.sme-insights.co.uk/wp-content/uploads/2026/11/64a8e-17936554951343-1920.avif?w=640 640w, https://www.sme-insights.co.uk/wp-content/uploads/2026/11/64a8e-17936554951343-1920.avif?w=1045 1045w, https://www.sme-insights.co.uk/wp-content/uploads/2026/11/64a8e-17936554951343-1920.avif?w=1200 1200w, https://www.sme-insights.co.uk/wp-content/uploads/2026/11/64a8e-17936554951343-1920.avif?w=1460 1460w, https://www.sme-insights.co.uk/wp-content/uploads/2026/11/64a8e-17936554951343-1920.avif?w=1600 1600w, https://www.sme-insights.co.uk/wp-content/uploads/2026/11/64a8e-17936554951343-1920.avif 1920w”>Start at this fast-travel point (Image via Pearl Abyss)
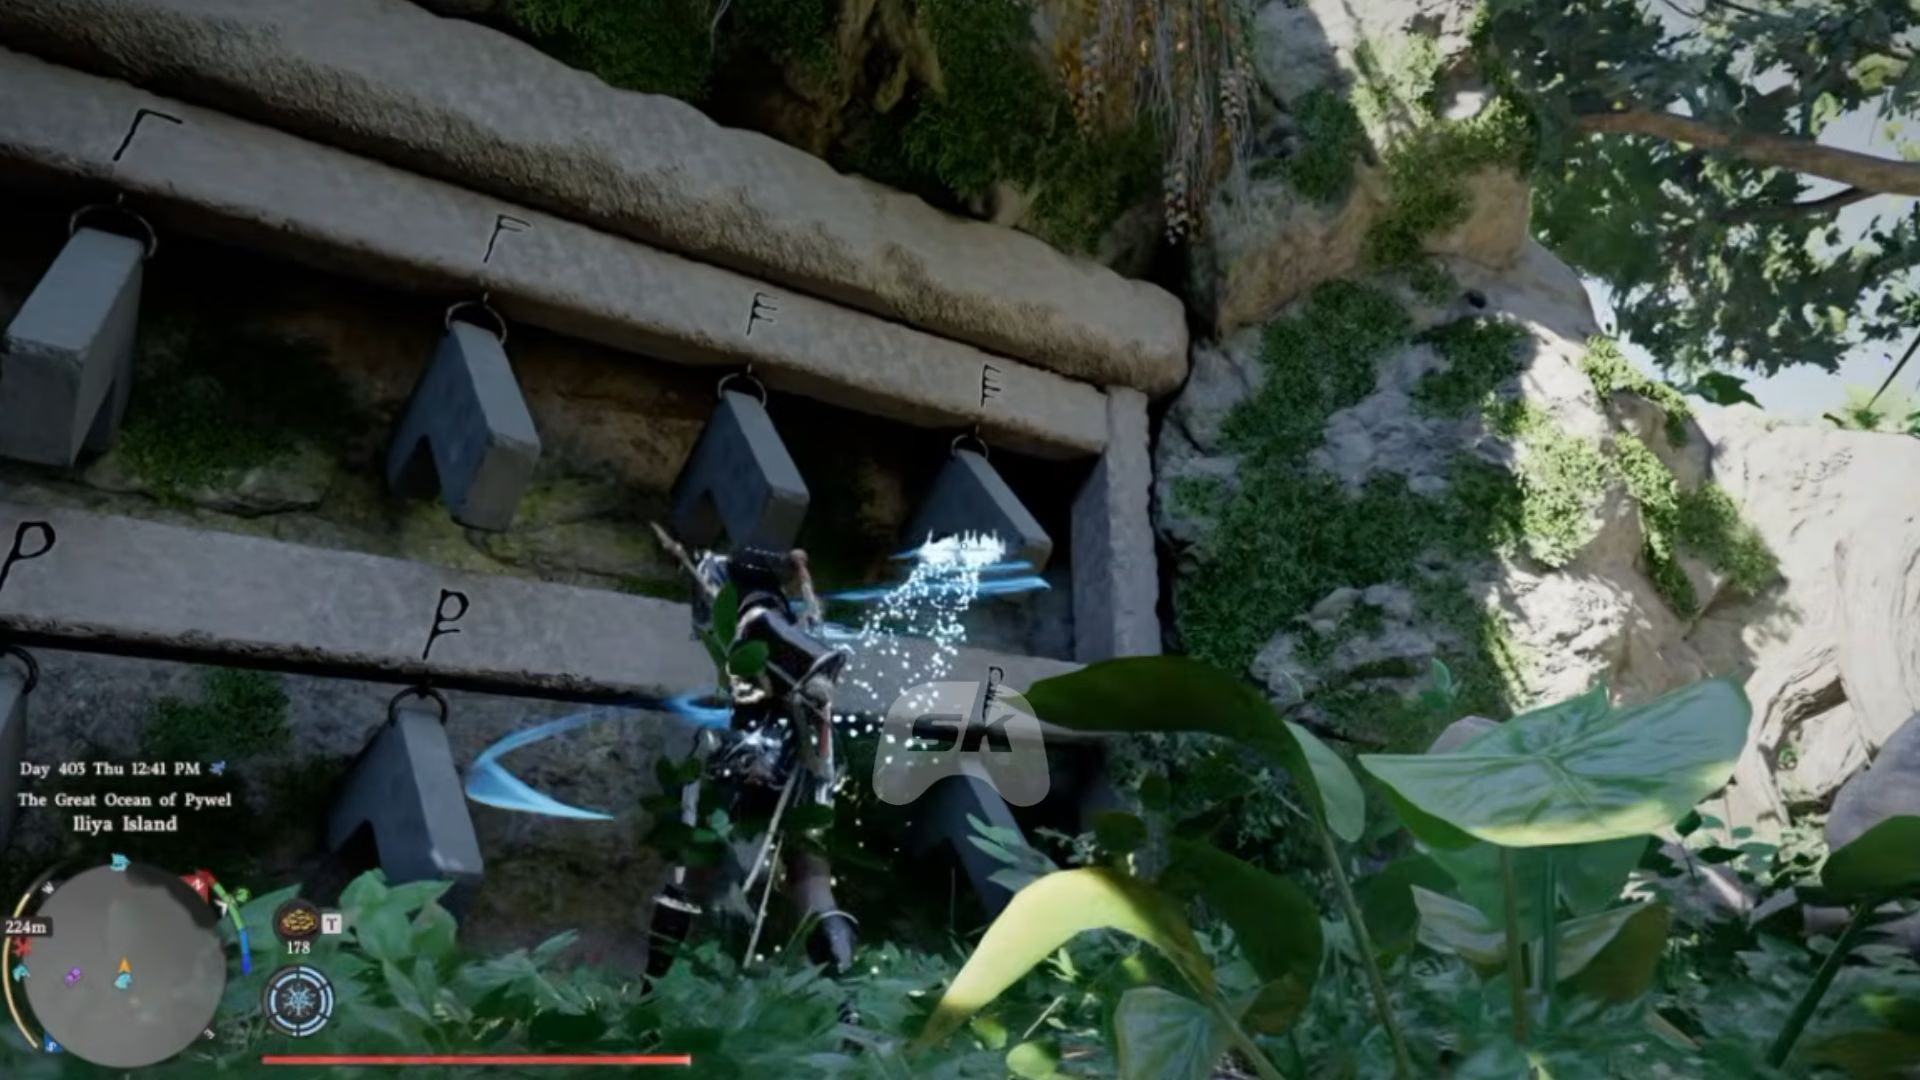
The island has another secret puzzle for you to solve. Stand at the fast-travel point shown in the image above, and head east till you fall off the cliff. This will drop you into a pit with a giant mural and bell-like mechanisms near it.
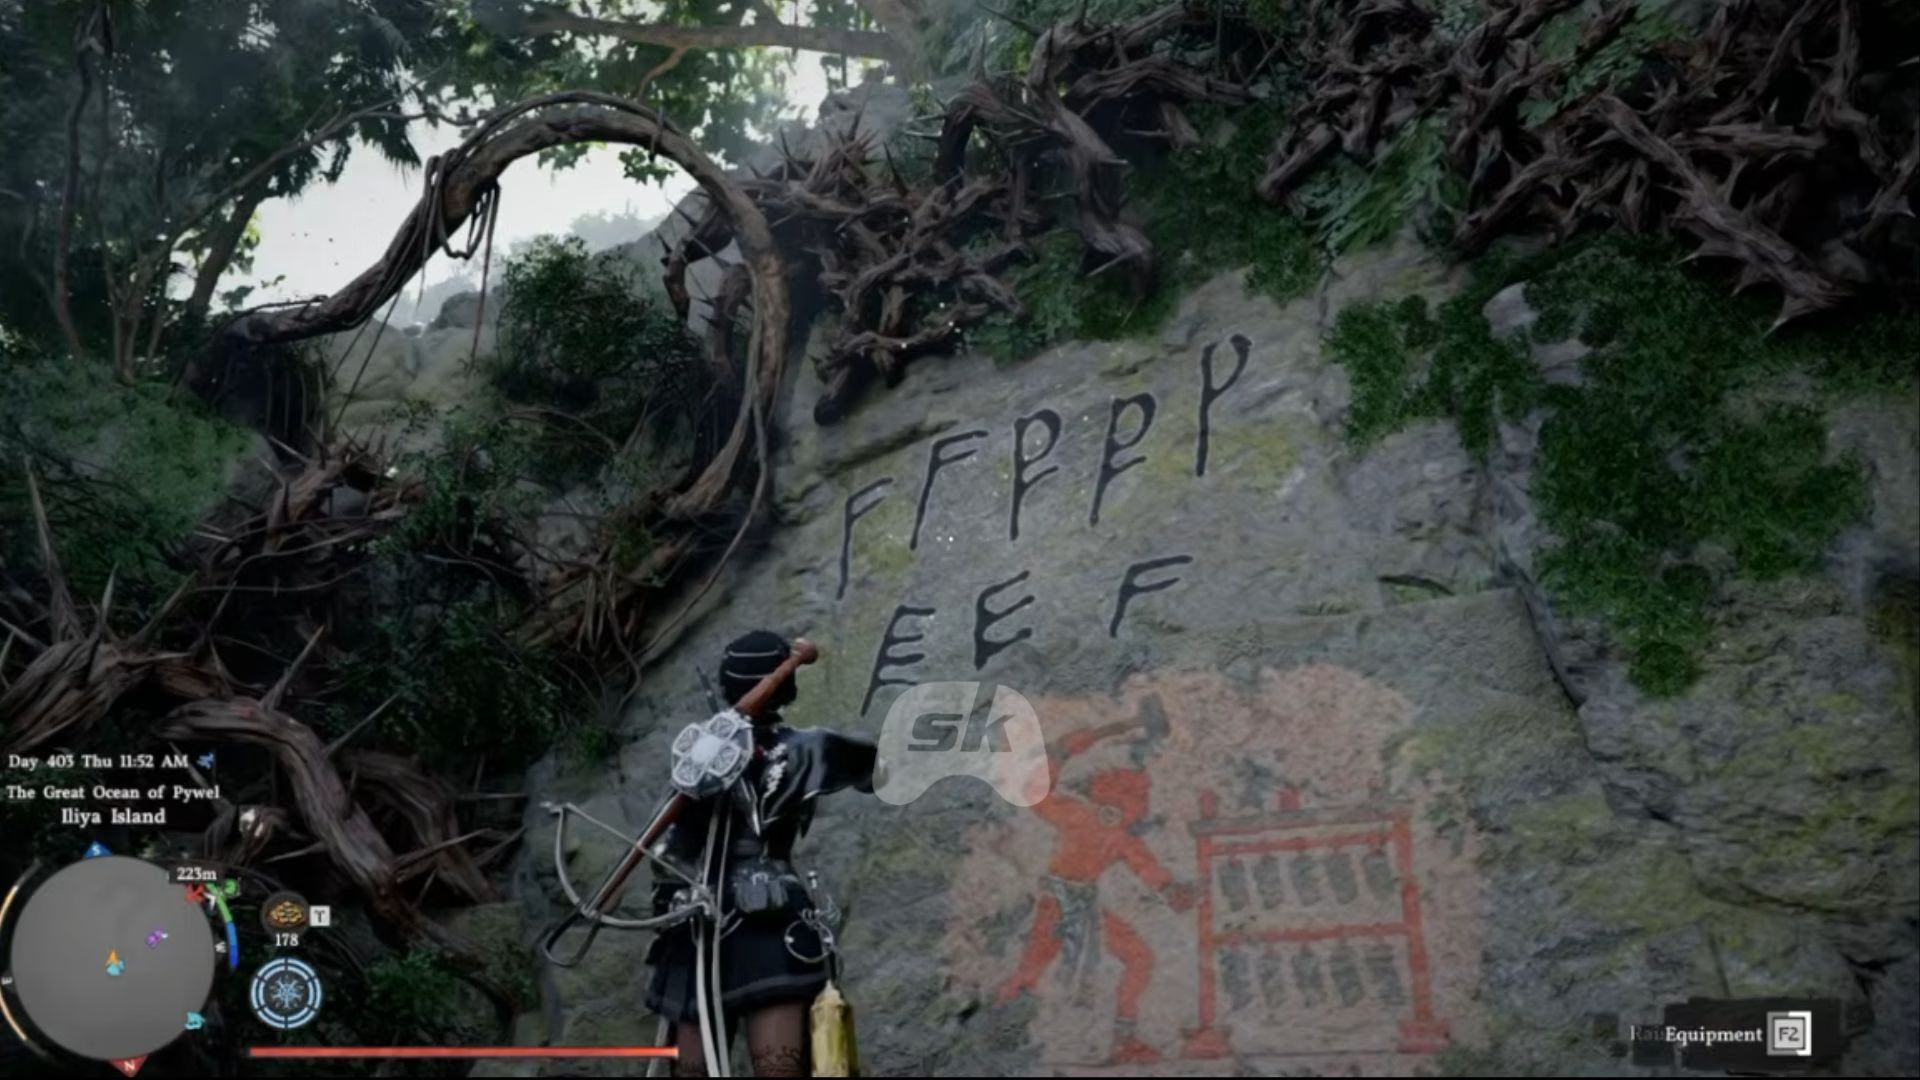
” srcset=”https://www.sme-insights.co.uk/wp-content/uploads/2026/11/5c822-17936556450501-1920.avif?w=190 190w, https://www.sme-insights.co.uk/wp-content/uploads/2026/11/5c822-17936556450501-1920.avif?w=720 720w, https://www.sme-insights.co.uk/wp-content/uploads/2026/11/5c822-17936556450501-1920.avif?w=640 640w, https://www.sme-insights.co.uk/wp-content/uploads/2026/11/5c822-17936556450501-1920.avif?w=1045 1045w, https://www.sme-insights.co.uk/wp-content/uploads/2026/11/5c822-17936556450501-1920.avif?w=1200 1200w, https://www.sme-insights.co.uk/wp-content/uploads/2026/11/5c822-17936556450501-1920.avif?w=1460 1460w, https://www.sme-insights.co.uk/wp-content/uploads/2026/11/5c822-17936556450501-1920.avif?w=1600 1600w, https://www.sme-insights.co.uk/wp-content/uploads/2026/11/5c822-17936556450501-1920.avif 1920w”>The illustration is key to solving the puzzle (Image via Pearl Abyss)
Use your Blinding Flash ability to burn off the rose-like thorn branches around the mural. Once they’ve been incinerated, look at the mural and the bell-like mechanism again. The mural features the alphabet of a foreign language, and the same letters mark the bells.
” srcset=”https://www.sme-insights.co.uk/wp-content/uploads/2026/11/fa741-17936559861998-1920.avif?w=190 190w, https://www.sme-insights.co.uk/wp-content/uploads/2026/11/fa741-17936559861998-1920.avif?w=720 720w, https://www.sme-insights.co.uk/wp-content/uploads/2026/11/fa741-17936559861998-1920.avif?w=640 640w, https://www.sme-insights.co.uk/wp-content/uploads/2026/11/fa741-17936559861998-1920.avif?w=1045 1045w, https://www.sme-insights.co.uk/wp-content/uploads/2026/11/fa741-17936559861998-1920.avif?w=1200 1200w, https://www.sme-insights.co.uk/wp-content/uploads/2026/11/fa741-17936559861998-1920.avif?w=1460 1460w, https://www.sme-insights.co.uk/wp-content/uploads/2026/11/fa741-17936559861998-1920.avif?w=1600 1600w, https://www.sme-insights.co.uk/wp-content/uploads/2026/11/fa741-17936559861998-1920.avif 1920w”>Attack the bells (Image via Pearl Abyss)
To solve this puzzle, you need to ring the bells as per the order shown in the mural. First, attack the bells in the order of the alphabet shown in the first row. Then head to the second row and follow the same steps.
The bells will then play out a melody, unlocking a secret cavern for you, where you’ll find an Abyss Cresset.
Iliya Island Mural location
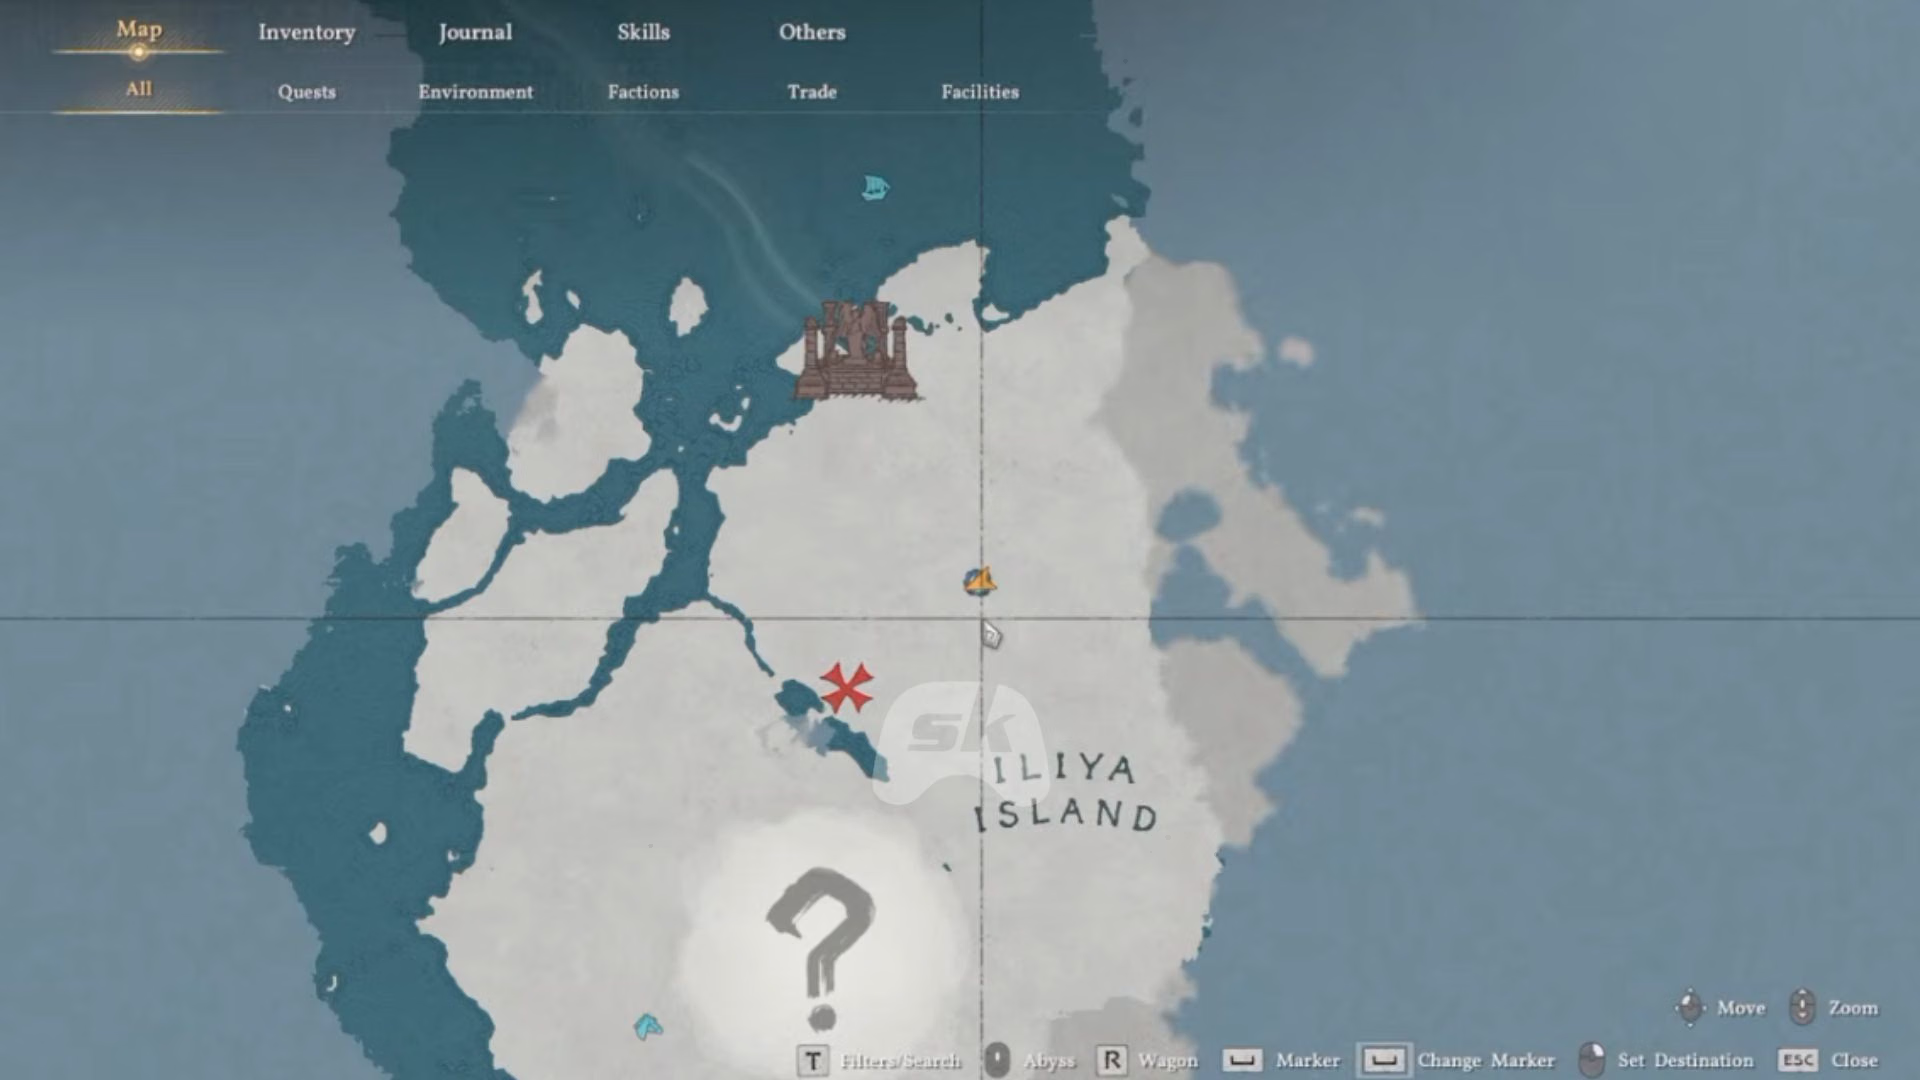
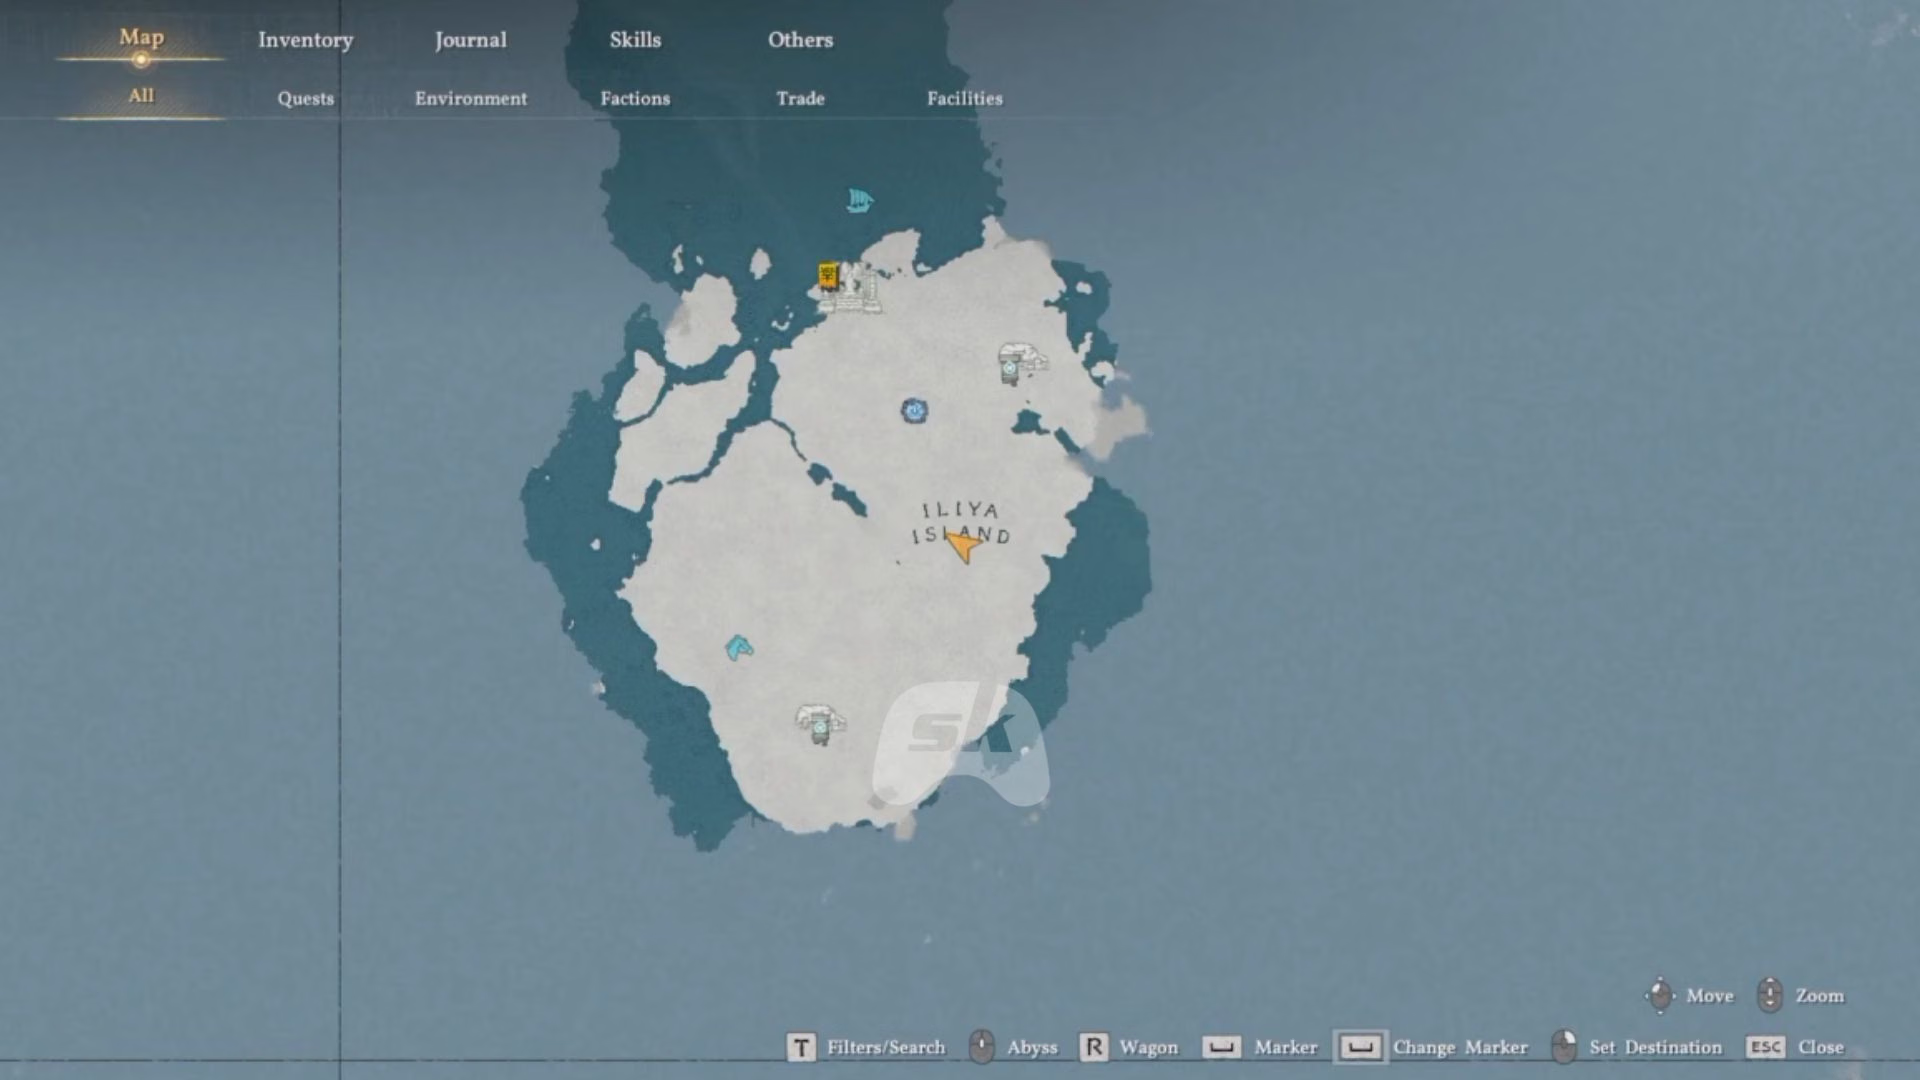
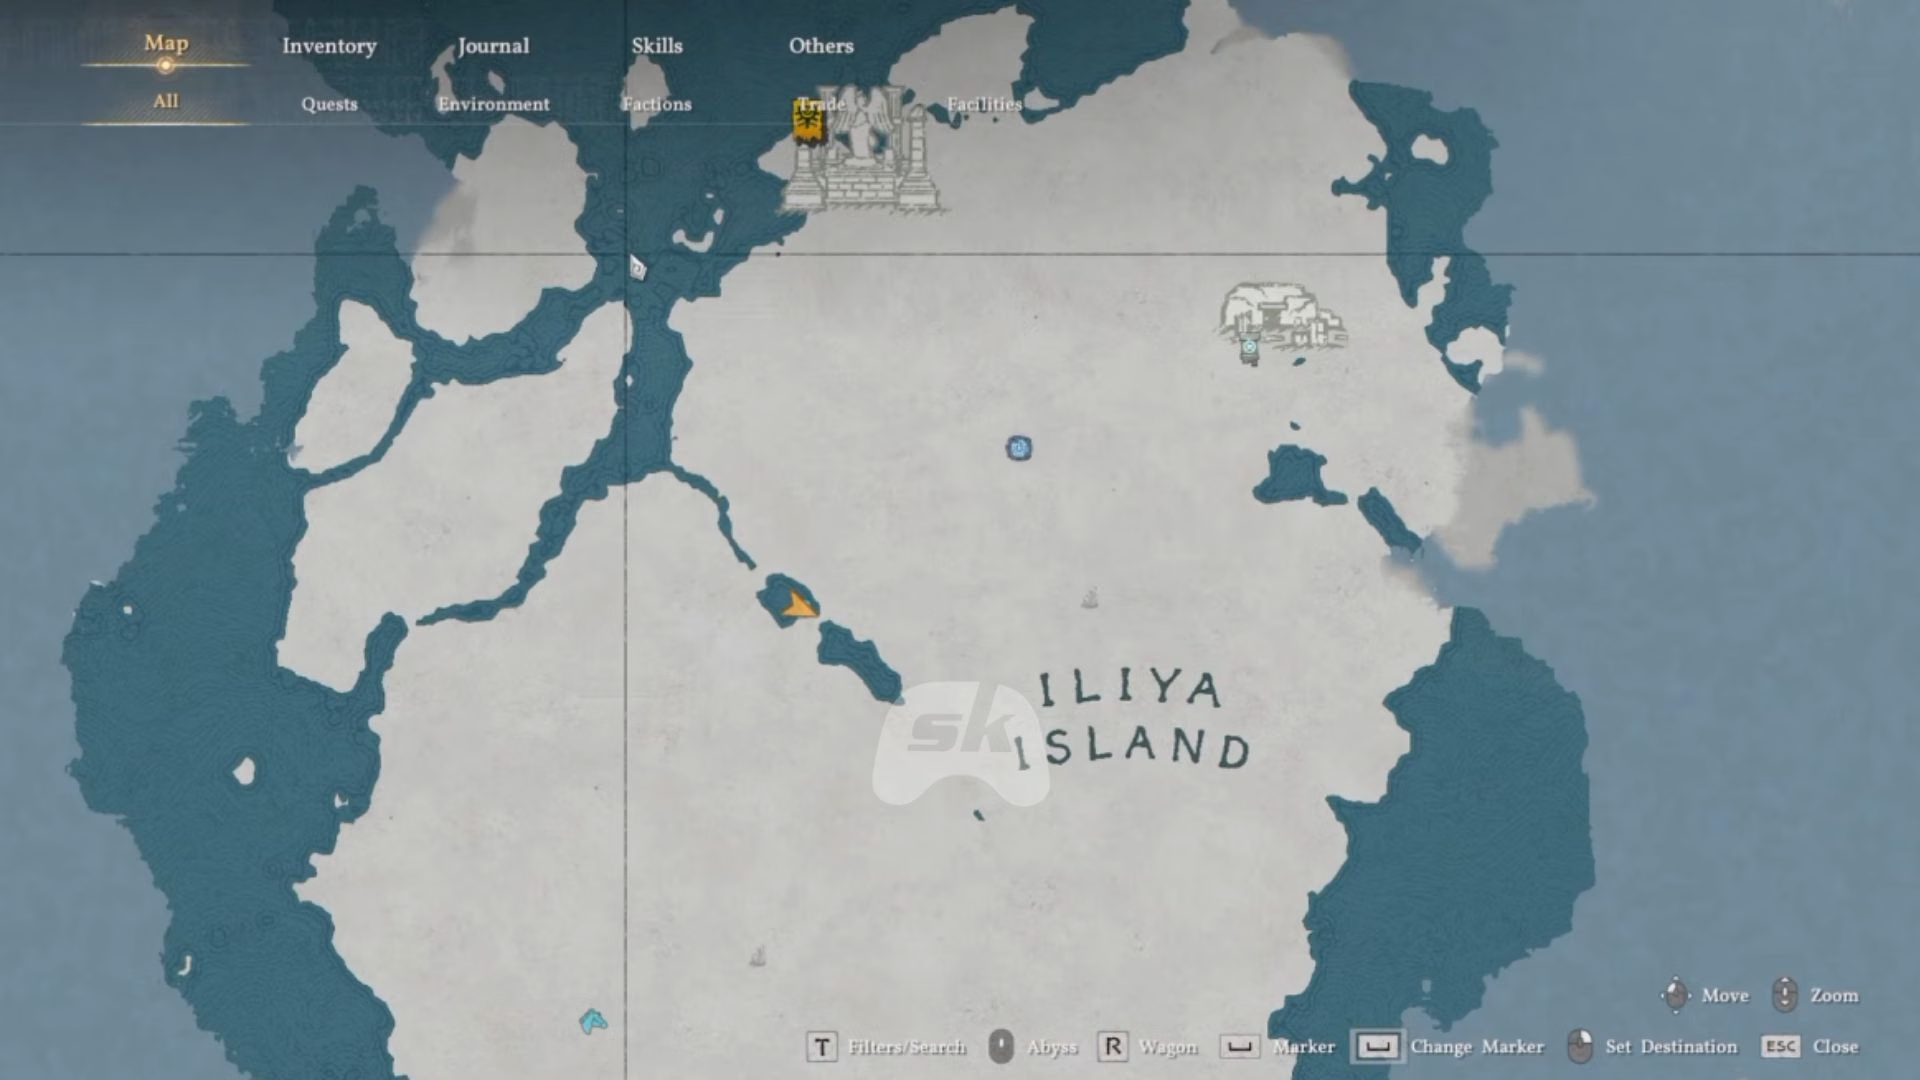
” srcset=”https://www.sme-insights.co.uk/wp-content/uploads/2026/11/92e3b-17936539503075-1920.avif?w=190 190w, https://www.sme-insights.co.uk/wp-content/uploads/2026/11/92e3b-17936539503075-1920.avif?w=720 720w, https://www.sme-insights.co.uk/wp-content/uploads/2026/11/92e3b-17936539503075-1920.avif?w=640 640w, https://www.sme-insights.co.uk/wp-content/uploads/2026/11/92e3b-17936539503075-1920.avif?w=1045 1045w, https://www.sme-insights.co.uk/wp-content/uploads/2026/11/92e3b-17936539503075-1920.avif?w=1200 1200w, https://www.sme-insights.co.uk/wp-content/uploads/2026/11/92e3b-17936539503075-1920.avif?w=1460 1460w, https://www.sme-insights.co.uk/wp-content/uploads/2026/11/92e3b-17936539503075-1920.avif?w=1600 1600w, https://www.sme-insights.co.uk/wp-content/uploads/2026/11/92e3b-17936539503075-1920.avif 1920w”>Start at this location (Image via Pearl Abyss)
Iliya Island also has a Mural for you to find, but finding it can be a little tricky. Start at the location shown in the image above. You want to stand between the ‘L’ and ‘A’ on the map.
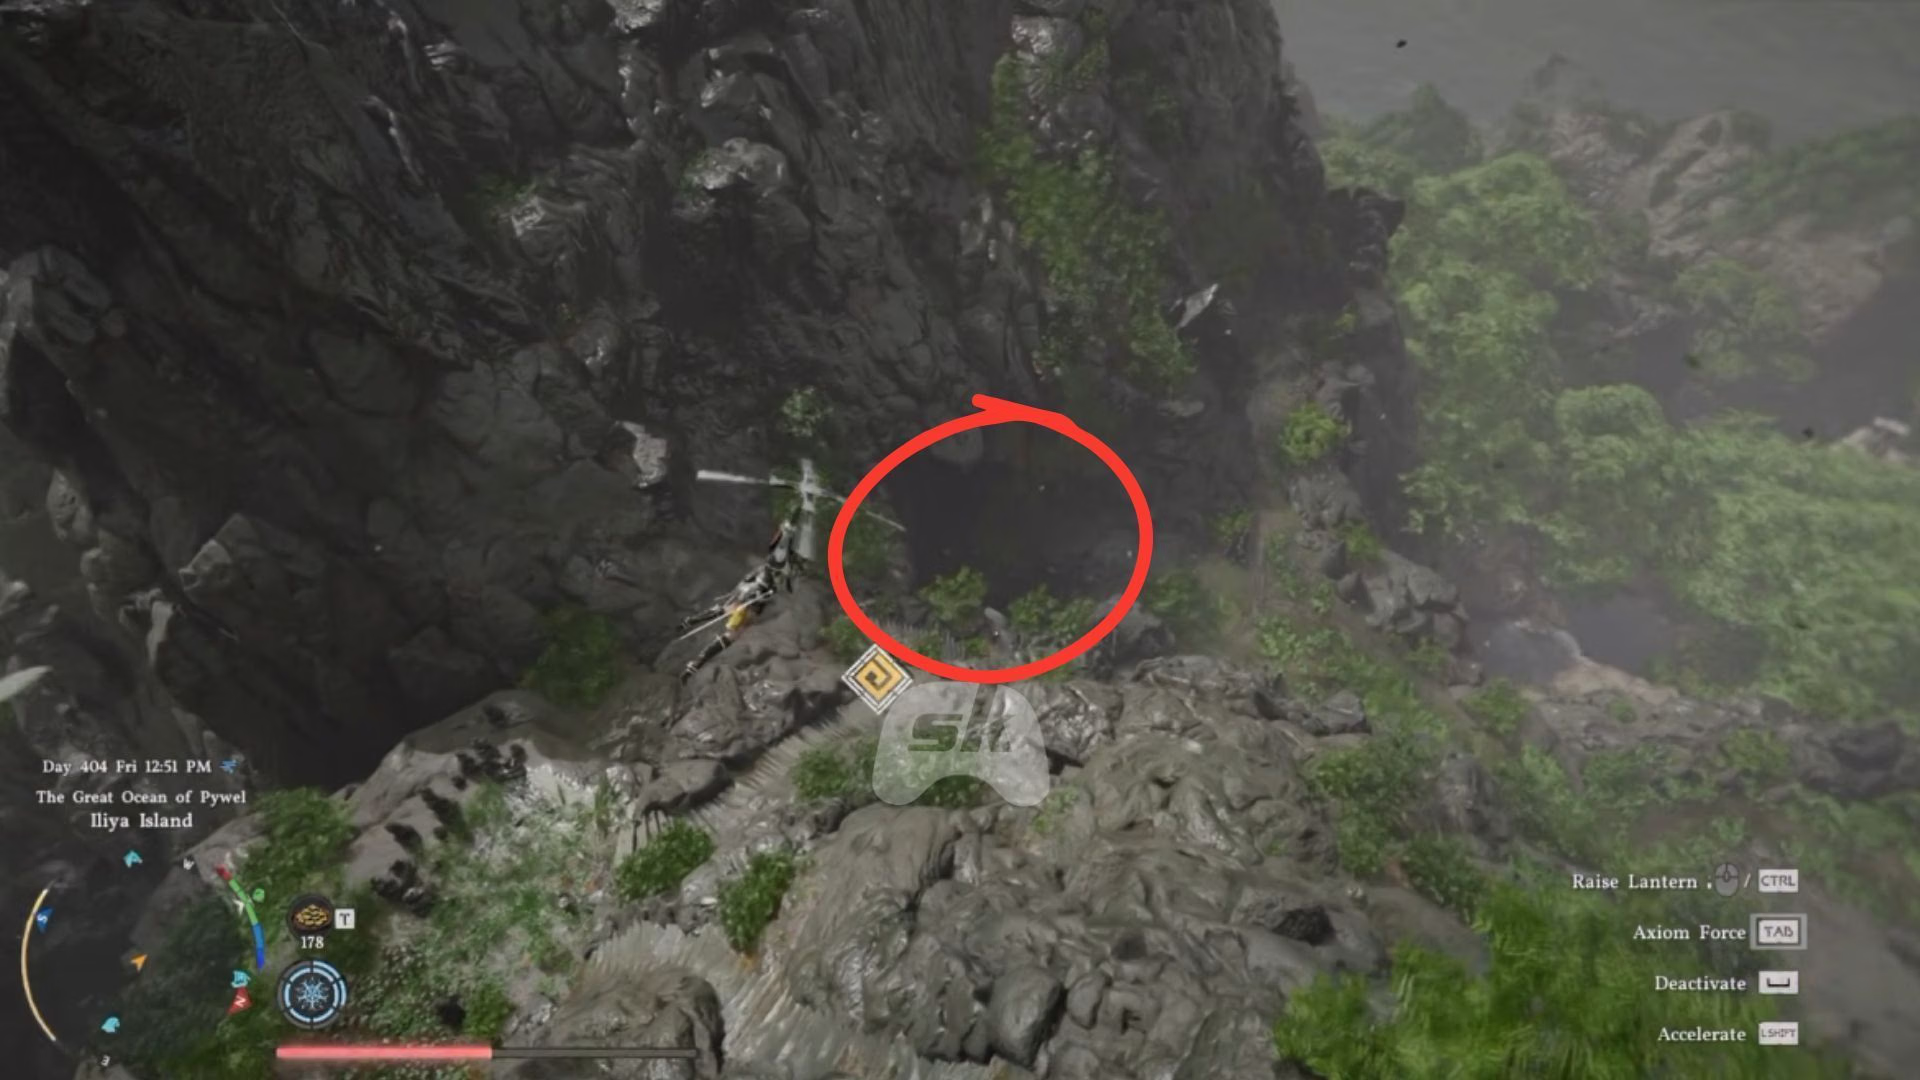
” srcset=”https://www.sme-insights.co.uk/wp-content/uploads/2026/11/99f16-17936541365595-1920.avif?w=190 190w, https://www.sme-insights.co.uk/wp-content/uploads/2026/11/99f16-17936541365595-1920.avif?w=720 720w, https://www.sme-insights.co.uk/wp-content/uploads/2026/11/99f16-17936541365595-1920.avif?w=640 640w, https://www.sme-insights.co.uk/wp-content/uploads/2026/11/99f16-17936541365595-1920.avif?w=1045 1045w, https://www.sme-insights.co.uk/wp-content/uploads/2026/11/99f16-17936541365595-1920.avif?w=1200 1200w, https://www.sme-insights.co.uk/wp-content/uploads/2026/11/99f16-17936541365595-1920.avif?w=1460 1460w, https://www.sme-insights.co.uk/wp-content/uploads/2026/11/99f16-17936541365595-1920.avif?w=1600 1600w, https://www.sme-insights.co.uk/wp-content/uploads/2026/11/99f16-17936541365595-1920.avif 1920w”>You have to enter the cavern here (Image via Pearl Abyss)
Once you’re on this vantage point, jump off and glide towards the west. To your left, you’ll find a small cavern entrance, as shown in the image above. Enter the cavern, and dive into the pool of water by the entrance. You’ll find the Mural next to this pool.
” srcset=”https://www.sme-insights.co.uk/wp-content/uploads/2026/11/47004-17936525421130-1920.avif?w=190 190w, https://www.sme-insights.co.uk/wp-content/uploads/2026/11/47004-17936525421130-1920.avif?w=720 720w, https://www.sme-insights.co.uk/wp-content/uploads/2026/11/47004-17936525421130-1920.avif?w=640 640w, https://www.sme-insights.co.uk/wp-content/uploads/2026/11/47004-17936525421130-1920.avif?w=1045 1045w, https://www.sme-insights.co.uk/wp-content/uploads/2026/11/47004-17936525421130-1920.avif?w=1200 1200w, https://www.sme-insights.co.uk/wp-content/uploads/2026/11/47004-17936525421130-1920.avif?w=1460 1460w, https://www.sme-insights.co.uk/wp-content/uploads/2026/11/47004-17936525421130-1920.avif?w=1600 1600w, https://www.sme-insights.co.uk/wp-content/uploads/2026/11/47004-17936525421130-1920.avif 1920w”>Head to the waterfall here (Image via Pearl Abyss)
The Wolf Armor on Iliya Island is hidden in a small cave behind the waterfall at the center of the island. The image above marks where you need to go. Head to the location and stand facing the waterfall. You’ll then need to use the Stab ability to get behind the waterfall and enter the cave.
Once you’re inside the cave, run through the linear pathway and reach the end. You’ll find a treasure chest here, which you can then loot to acquire the Brynndor Wolf Armor. The armor has the following stats:
Health: 600
Attack: 23
Defense: 120
Crimson Desert Iliya Island secret treasure location: Phantom Ship blueprint
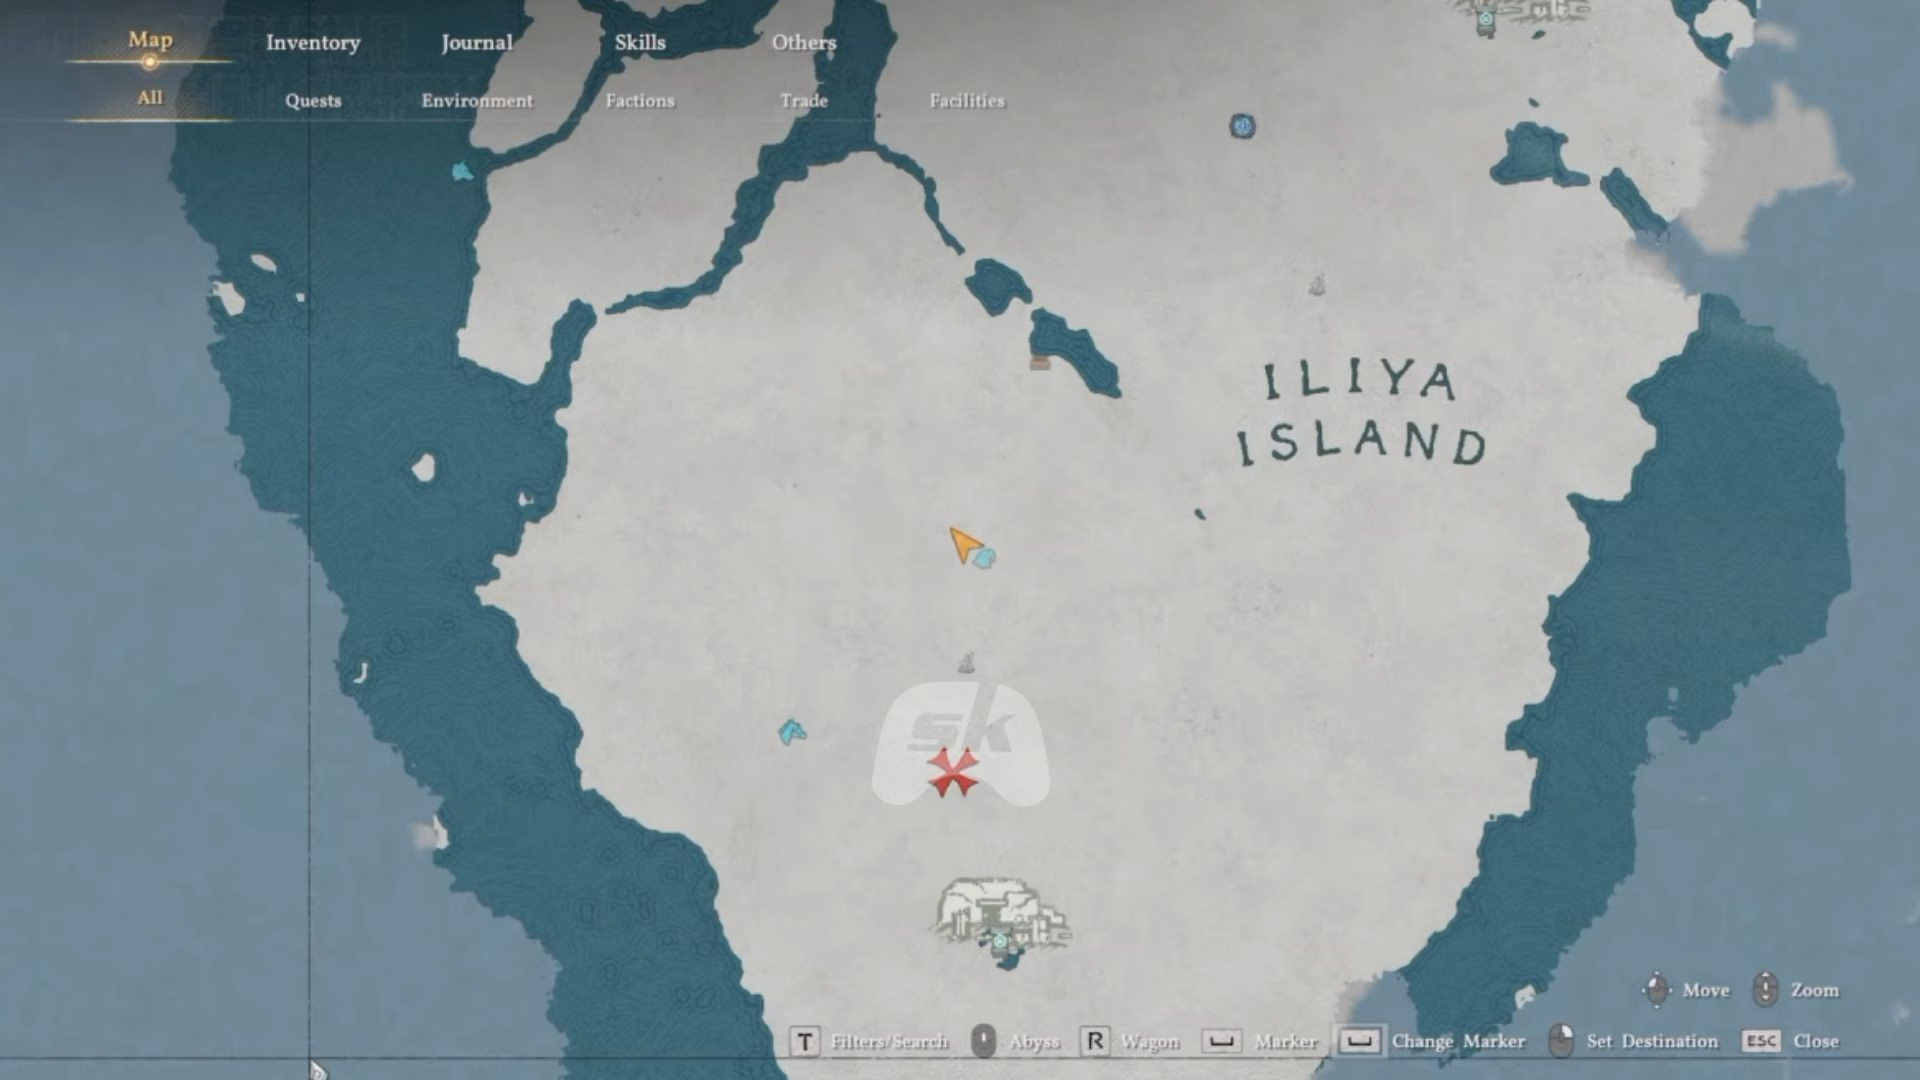
” srcset=”https://www.sme-insights.co.uk/wp-content/uploads/2026/11/2f607-17936530972711-1920.avif?w=190 190w, https://www.sme-insights.co.uk/wp-content/uploads/2026/11/2f607-17936530972711-1920.avif?w=720 720w, https://www.sme-insights.co.uk/wp-content/uploads/2026/11/2f607-17936530972711-1920.avif?w=640 640w, https://www.sme-insights.co.uk/wp-content/uploads/2026/11/2f607-17936530972711-1920.avif?w=1045 1045w, https://www.sme-insights.co.uk/wp-content/uploads/2026/11/2f607-17936530972711-1920.avif?w=1200 1200w, https://www.sme-insights.co.uk/wp-content/uploads/2026/11/2f607-17936530972711-1920.avif?w=1460 1460w, https://www.sme-insights.co.uk/wp-content/uploads/2026/11/2f607-17936530972711-1920.avif?w=1600 1600w, https://www.sme-insights.co.uk/wp-content/uploads/2026/11/2f607-17936530972711-1920.avif 1920w”>Head to the red X marker (Image via Pearl Abyss)
After you’re done acquiring the armor, head further south from the waterfall and reach the location shown in the image above. As you approach this area, you’ll reach a giant tree next to a cliff. Circle this tree to reach the X marker.
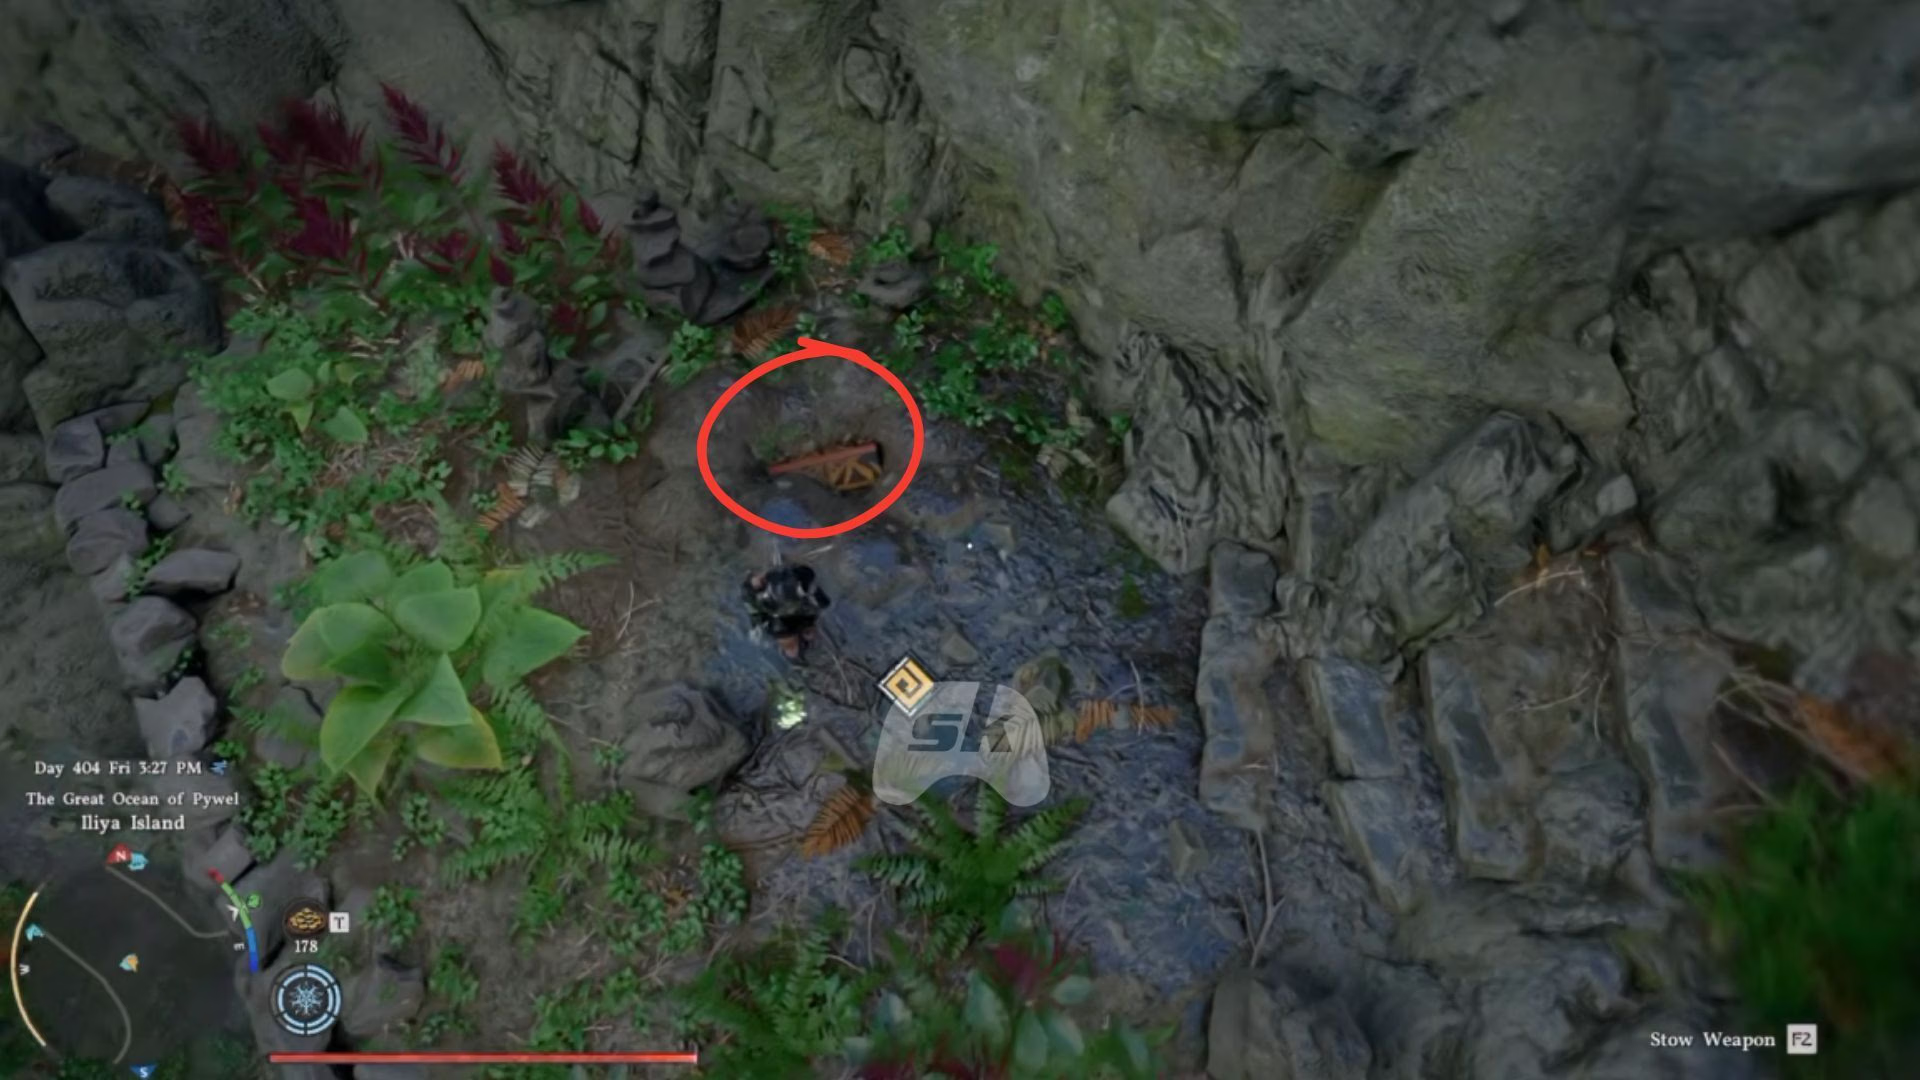
” srcset=”https://www.sme-insights.co.uk/wp-content/uploads/2026/11/d26c5-17936534883462-1920.avif?w=190 190w, https://www.sme-insights.co.uk/wp-content/uploads/2026/11/d26c5-17936534883462-1920.avif?w=720 720w, https://www.sme-insights.co.uk/wp-content/uploads/2026/11/d26c5-17936534883462-1920.avif?w=640 640w, https://www.sme-insights.co.uk/wp-content/uploads/2026/11/d26c5-17936534883462-1920.avif?w=1045 1045w, https://www.sme-insights.co.uk/wp-content/uploads/2026/11/d26c5-17936534883462-1920.avif?w=1200 1200w, https://www.sme-insights.co.uk/wp-content/uploads/2026/11/d26c5-17936534883462-1920.avif?w=1460 1460w, https://www.sme-insights.co.uk/wp-content/uploads/2026/11/d26c5-17936534883462-1920.avif?w=1600 1600w, https://www.sme-insights.co.uk/wp-content/uploads/2026/11/d26c5-17936534883462-1920.avif 1920w”>The treasure chest is here (Image via Pearl Abyss)
When you reach the location, you’ll find a bunch of stone pillars huddled up together. Stand at the southern edge behind these pillars, and jump to the area immediately below you.
You’ll find a treasure chest half-buried in the ground here, as shown in the image above. Dig the treasure chest out using a shovel, and then loot it to acquire the Phantom Ship Blueprint.
Check out more topics below:
Are you stuck on today’s Wordle? Our Wordle Solver will help you find the answer.